The Sony Vita has officially been released for a little over a week now here in the States, and we won’t know how well it’s doing for at least a month. It’s no secret that Sony has been struggling as of late, between the overall disappointment of the PSP, the failure of the PSP Go and massive company wide losses. Launching the Vita puts them in a position to turn things around on the handheld gaming side of things, especially with the potential the system holds. In this guy’s view however, there are some big changes that the Vita has to make compared to its predecessor.

First, build its identity.

What can buyers expect with the Vita? Is it a game system? Is it a multimedia device? While it’s obvious to gamers who have followed the progress of the system that the Vita is the follow up to the PSP, I don’t feel Sony has made that apparent in the way that it’s been presented in the eye of those who don’t refresh gaming news pages 50 times a day. Especially with the option for a 3G subscription, you have to make sure that parents, kids and the overall average joe knows that it’s a gaming system first, because if all they want are apps and 3G subscriptions, they can get that on their phones.

Focus on the games!

While adding DVD playback to the PS2 made a big difference when it came to sales, the PS3 flat out sold itself as a blu ray player that happens to play games at certain points during its life span. Hell, that’s pretty much how they tried to justify the initial $600 price point. Sony cannot make the same mistake with the Vita by focusing on its supplimental features over its core function: playing video games. As long as the Vita has great games that you can only find there, Sony will have a consistent base of gamers purchasing the system throughout its lifespan.

These matter more than a faulty GPS.

Make it unique.

The PSP’s marketing made a major mistake that hurt it throughout its lifespan, and I don’t think Sony necessarily sees it as one. Sony advertised the PSP as a portable PS2, much like the Vita is being shown off as a type of PS3 in your pocket. To gamers and non gamers alike, why should we be expected to pay up to $300, a subscription fee and $50 on memory when I can already play PS3 games on the PS3 sitting at home? A damn near $400 commitment is too high of a premium to be able to play the same games “on the go.” Games like Wipeout are also available on the PS3 and while Uncharted: Golden Abyss is a Vita exclusive, no matter how impressive it was, I was constantly reminded throughout game play that I was playing an inferior version of Uncharted. Considering that I could of just popped in any of the three console versions at home, why did I need a Vita again?

I feel like I’ve seen this before.

That’s where Nintendo has always done well when it comes to their handhelds, and it wouldn’t hurt Sony to follow suit. When  most games are on the DS, 3DS or Game Boy, they stay there, usually taking parts of what made the console versions great while keeping the portable version unique. Whether it’s Mario 3D land’s take on 3D platforming with shorter, more focused levels, Zelda: Phantom Hourglass’s unique control and puzzle elements that couldn’t be done on consoles or each Mario Kart entry that finds ways to feel different from the last with a change up in mechanics, I’ve rarely played a portable Nintendo game and felt that it would have been just as good or better on consoles. If it were up to me, Sony would use games like Uncharted to get their foot in the door while heavily pushing games like Sound Shapes and Gravity Rush. Those are the money makers when it comes down to it. As long as the great exclusive content keeps flowing, you’ll have more adopters, fewer people regretting their purchase and an overall happy fan base.

You can’t tell me Gravity Rush doesn’t look awesome.

No gimmicks for the sake of gimmicks.

Now here’s an area where Nintendo fails at times. While I say Sony should make the games unique, that doesn’t mean that they should force features in that don’t fit. Once again, in Gravity Rush, using the gyroscopic controls completely works, but it also gives you the choice of using traditional controls. This is what the Vita needs to do more often, making the most out of the two touch pads, the motion controls, the cameras and the augmented reality features without making them required or forced. To use another example of what not to do, the demo of Uncharted I played had some awkward, forced touch control that disrupted the flow of the game. To cut through a curtain, I had to stand in front of it until a menu came up for side equipment that was only accessible during touch screen sections. THEN, I had to tap the knife and make predetermined swiping patterns over the screen to cut through. Keep in mind that all of this could have been accomplished by pushing a button in front of the curtain and having Drake cut through it on his own. It slowed the game down, was fairly tedious, added nothing to the experience and felt completely unnecessary.

Stop alienating gamers.

During the Vita’s reveal at E3, it was mentioned that the game cards had their own memory. Save files and DLC could be saved to the card, potentially eliminating the need for memory cards. Then they announced that the Vita would launch with close to 30 “titles.”

Everything sounded all well and good until it turned out that not only would memory cards be needed, but they’re unique to the Vita and are fairly expensive, (so you can’t even use your old Memory Sticks.) Some games will store the data on the game card, but those games can’t have their data moved to the memory card, taking away that freedom, (which is also one of the big problems with the 3DS and its SD card support.) Oh, and out of those 30 “titles,” it turned out that a big chunk of them were apps, not actual games. On top of these slaps to the face, Vita’s are locked to one profile per system, so if your brother, sister, husband, wife or life partner want to play with their profile, guess what? You’ll have to throw Sony another $250 or wipe the original Vita clean. Oh, but that’s right. There’s really no other real choice since no self respecting adult would play a 3DS in public according to Sony Computer Entertainment of America’s CEO, Jack Tretton.

These kind of practices won’t sit well with the average gamer, and while there will always be Sony loyalists who defend every decision they make as ones we should “get over,” most will abandon ship rather than turn the other cheek. At the end of the day, gamers are what the Vita needs the most, and if they keep pissing them off, there’s no way it can be a success.

And no self respecting businessman would be such a douche.

And lastly, games, not graphics.

For almost as long as I’ve been a gamer, graphics have always been a huge selling point. I remember the Genesis being so popular because it looked so good, all the way up to the PS3 and 360 making such a heavy push for HD. But the truth of the matter is that graphics can only get you so far. Think about it, despite us being told that graphics are the measure of how far games have advanced, the best looking system is hardly ever the best selling one. Just look at the PSP vs the DS, or even the consoles of this gen. If the Wii proved anything, it showed that people will buy for the enjoyment they get from the games, not how it looks in 1080P, (and I think some of the backlash the Wii gets is due to it challenging this idea that great games equals great graphics, but that’s beside the point.)

Right now, Vita is focusing on how powerful it is. That’s all well and good for its debut so we can see at first glance how much more advanced it is than the PSP, but that can’t be the focus for too long. When I played the PSP the most, it was with simpler looking games like Locoroco, Patapon and Prinny, which were a lot more fun to me than pretty games like Crisis Core or Kingdom Hearts. And going back to my two favorite examples, Gravity Rush and Sound Shapes aren’t going to break any records for their high polygon counts, but from what I’ve played, I’d much rather spend my money on those than another nice looking Uncharted game that will last me all of five hours.

Sound Shapes might not look the best, but it’s damn fun!

Whether or not the Vita will be a long lasting staple in our gaming libraries or an HD flash in the pan won’t be seen for a long while, but Sony can’t keep making the same mistakes. All I know is that for this new handheld to be successful, this gaming giant will need to take a different approach than they have in the past. Gamers will flock to the system if it’s made to seem like a must own machine that provides unique experiences at a great value. But most of all, it needs to be FUN! It’s in gaming’s best interest for the Vita to be a strong competitor because in the end, competition will bring out the best in everyone involved and it’ll be gamers that win. It’s just up to Sony to step up their game. At this point, they don’t have much choice.

Are you in LA this Thursday?  Do you like fighting games? If you don’t, do you like free food and drinks? Of course you do! Well you’re in luck, because Capcom is throwing a huge Street Fighter X Tekken party from 8PM to midnight on March 1st.

Gamers will get another chance to try out the upcoming fighting game before its release, using a tweaked Street Fighter IV engine to bring the two universes together in this huge crossover brawler. Featuring the best of the best from the the Tekken and Street Fighter rosters, we’ll finally be able to play out some of our potential dream matches. Ryu vs Kazuya? Guile vs Paul in the battle of Americans with screwed up hair? Or Zangief vs. Kuma in a bear vs bear wrestler match?

Come play the game, meet some people, check out the cosplayers and hang out. But make sure to register ahead of time, because space is limited to the first 1000 and ID is required since the event is 21 and over. If you haven’t done so, you can register here.

Late last week, Nintendo held their Direct Video conference and dropped a bomb on North American RPG fans. The Last Story, a Wii exclusive RPG that was never supposed to see the light of day in the west, is being brought over thanks to a publishing deal with Xseed games. And yet, it’s ironic that a big reason why this game is seeing the light of day here is because of a little bit of rainfall.

If you’re wondering why this is such a big deal, there are a few reasons. First, this is the next major RPG developed by the folks at Mistwalker Studios, headed by the father of the Final Fantasy series, Hironobu Sakaguchi, (Last Story, Final Fantasy… Get it!?) Impressions coming in from Japan and Europe are incredibly positive, showing that Sakaguchi has not lost a step when it comes to creating these epics. After all, the last good single player Final Fantasy to me was the X series, (yes, including X-2.) And what a coincidence, these were the last ones he worked on. This game is the real next step in the series in my imaginary world where FFXII and XIII don’t exist.

To think we almost weren’t going to get this.

Second, it’s one of two high quality JRPG’s coming to a system that’s not only starving for RPG’s, but games period at this point. With Nintendo focusing on the Wii U, Wii owners haven’t had much to do in the way of new games for awhile now. Maybe the promise of a mini JRPG revival in a generation that’s been lacking all around in the genre will send the Wii out on an incredibly high note.

And lastly, it proves that a group of passionate fans can make a difference when they’re persistent, respectful and enthusiastic. Since the creation of Operation Rainfall, the Facebook group dedicated to bringing three Wii exclusives to the west after Nintendo of America had shown no interest in shipping them over, they’ve built awareness and a following that couldn’t be ignored. The first game of their campaign, Xenoblade Chronicles, was announced for an April release a few months back, and now with The Last Story on its way, even if they were to stop at this point, it’s impossible to argue that this wasn’t a huge victory. Plus, it proves the naysayers, pessimists and douche bags who berate groups like these by saying they’re “whining” because they won’t accept the unfair decisions that are force fed to them wrong. Capcom fans can learn a thing or two from this.

The Last Story is scheduled to be released this Summer, with Xenoblade coming out April 6th. The third game, Pandora’s Tower, has yet to be announced, but with the momentum this movement has built, don’t be surprised to hear about it soon. Until then, check out the new Last Story trailer that hit the webz after the announcement and prepare to get hyped!

During the Pokemon Smash! TV show in Japan, Game Freak head Junichi Masuda let the electric shooting cat out of the bag; Pokemon Black and White 2 are headed to the DS!

The announcement was surprising on many levels. First, it’s no shocker that a new version of Black/White would be coming eventually, especially considering the series is known for releasing a third “enhanced” version, (and by enhanced, I mean the same game with a few slight changes.) However, these games are the first full fledged sequel within a Pokemon generation. Whether or not the game will have a new story, an updated Unova region or a new region altogether remains to be seen, but I’m crossing my fingers that the game will expand on the surprisingly well told story from the originals. Oh, and now there are two new versions instead of one, proving once again that Pokemon’s strongest ability is the ability to print money.

Secondly, while I have no idea how the games would properly communicate if they were on different platforms, it seems to be a shock to some that the games are coming to the DS instead of the 3DS. It makes sense to me that a direct sequel to a DS game should remain on the DS while the next generation is prepped for the 3DS, especially since the 3DS is fully backwards compatible, but I feel for my 3DS owners who want their creatures to take advantage of their shiny new handheld. Let’s just hope that the games will have extra 3DS functionality or bonuses, like Zelda: Oracle of Seasons and Ages did for the GBA.

And lastly, the cover Pokemon seems to be the complete version of the three main Legendaries from the first games. It was said that the previous mascots, Reshiram and Zekrom, were once one Pokemon that split into two, while the hidden ice beast Kyurem was implied to be their discarded body after the split. What can these new creatures be? Are they new Pokemon, or are they Kyurem with either Reshiram’s fire element or Zekrom’s electric element? I can’t wait to find out!

Black and White 2 will hit Japanese shelves in June, while the games will be “coming soon,” to North America.

A few days ago a Reddit user named MikkelManDK found a .NFO file on his copy of Syndicate bought and purchased from Origin. If you’ve ever pirated a game before, like I have many…many…many time, you will be accustomed to this .NFO file. It usually contains all the instructions on how to install the game, with the crack and get it up and running in no time.

This particular .NFO file had instructions from the game devs.

1.Insert Disc

2.Play Game.

It also contained a message to any would be pirates that if they ever cared to submit a resume to Starbreeze, the game developers, that they would accept all sent in. 

This is just another example of all the good guys that work under the evil EA publisher logo.

Syndicate MINI REVIEW: So this game came out on my birthday, I had been waiting for this game since it’s E3 announcement trailer, and to top it off they got four very prominent electronic music producers involved with the soundtrack, (Skrillex,  Nero, Digitalism and Flux Pavilion.) so I was sold right away. This game is pretty as shit, even on the lowest graphical settings on the PC version, it still blows me away. It looks like a love child of Brink, Mirrors Edge , Deus Ex and Blade Runner. I haven’t eaten much of the single player but the COOP is amazing. Most people are saying its the saving grace of the single player. Playing it with 3 other friends is a real treat. You create a Syndicate and add members and can track your level against other groups online. Great character customization means you can program how your character moves, reacts and shoots their weapons. I am pretty biased because I fell in love with it right away but I believe I can look past the rose colored glasses and say its a pickup if you can find 3 others to play with you.

As you may or may not know, EA is planning on launching Mass Effect 3 copies into space starting tomorrow. Their journey can be tracked on their official website until it makes landfall. Rules regarding how to snag a copy before release will be posted soon. Until then, I’ll be working on my omniblade.

From the official website:

To celebrate Commander Shepard’s war to take Earth back, Mass Effect 3 will be the first console game launched into Earth’s upper atmosphere on a historic voyage. And you have a chance to take home a piece of that history.

Starting February 23rd, various cities across the globe will host their very own Space Edition launches. Starting with San Francisco, CA and ending in Berlin, Germany.

Track the packages on their flights and be the first to arrive at the landing zone to win an early copy of Mass Effect that has survived space travel. Each Space Edition also comes with an on-of-a-kind fan prize package. Other prizes will also be given out to runner-up participants (subject to availability).

Check back soon for rules and contest entry.

The launch dates are as follows:

San Francisco: February 23 – 7:00 AM & 10:00 AM

Las Vegas: February 24 – 7:00 AM & 9:00 AM

New York: February 25 – 7:00 AM & 9:00 AM

London: February 27 – TBD

Paris: February 28 – TBD

Berlin: February 29 – TBD

Can anyone help me calculate trajectories?

I don’t know about you, but my American Nightmare would be nothing but reality TV to watch and having to deal with a shitty economy. Wait, that’s already happening! Then I guess Alan Wake has it easy in the latest game in the series: “American Nightmare”.

If you haven’t finished the last Alan Wake DLC, “The Writer”, yet, you might want to before jumping into American Nightmare. I am sure you can play through without having played the DLC, but a lot of the context surrounding what’s going on will be lost on you. Since, to me, Alan Wake has been more about the story than the gameplay, this is a big deal. What surprised me when starting up American Nightmare was being greeted by live action video. It made me wish that the whole game could be played out as an FMV adventure game with how well the production value was on this.

The combat seems to be more fluid than it has been in the previous Alan Wake games which is offset by the amount of ammo given to you. I was never found wanting for ammo at all through the entire story mode. Everywhere you turn, there’s ammo. Just in case you can’t find the big flashy objects that your firearm desires, there are regenerating ammo and battery caches scattered throughout levels.

And although this time around there are new weapons to decimate the Taken, you are better off sticking to the sub-machine gun and shotgun combo. One thing I would have loved to be included while mixing it up with enemies is some sort of indication that I was about to get attacked from behind. I got overwhelmed a lot due to the sneaky bastards getting the drop on me. A subtle audio cue would be sufficient enough for me. Instead, I just mash on the dodge button and float like a butterfly while trying to unload buckshot into my pursuers.

Manuscripts play a bigger role in American Nightmare due to fleshing out the story even more for us story whores and being sort of a currency to unlock weapon cases for more powerful weapons. Finding the manuscripts are dead simple for the most part. Between the mini-map showing you a question mark when you are near one and the blinding light that emanates from the pages like it’s trying to send an S.O.S. to you, no one should have trouble exploring to find the manuscripts. I really, really suggest you find at least 40 manuscripts to get what I feel is THE best weapon in the game, besides light of course. The combat shotgun is essentially the AA-12 (Watch this for a brief primer on why this shotgun is amazing) and when I combined the flares with this magnificent beast, I felt unstoppable.

If you could care less about the story of Alan Wake: American Nightmare and more about shredding the Taken, arcade mode is for you, my good sir/madam. Pick a map, start the 10 minute timer and prepare to survive. With limited ammo for your bigger weapons, strategy plays an enormous role if you want to make it to sunrise as well as getting a reputable score on the leaderboards. The waves of enemies are endless. And the round finishes when you either die or make it the full 10 minutes.

I found it helpful to run around early and grab all of the ammo you can and then save the flashbangs and flare gun for the bigger threats as the waves increase in intensity. When in doubt, just run for your life until the timer runs out if you’re near the end. You won’t get those extra points for killing but at least you’ll survive with your life! More maps are unlocked as you progress through them and the later nightmare mode maps will definitely test just how well you handle the combat mechanics.

As a fan of the Alan Wake story, American Nightmare seemed to hit all of the right buttons for me. The dynamic of Alan Wake and Mr. Scratch plays so well that I was able to let go of the hangup that I had with a certain plot device in the game that I won’t spoil here but would probably be no sweat for Bill Murray. If you were one of many who wanted more Alan Wake, then there is no question that you’ll need to play this. Anyone else should play the main Alan Wake first or at least catch up on the story using the wiki or Youtube videos (although you will miss out on the atmosphere that Alan Wake brings to your senses when actually experiencing it for yourself)!

When it comes to modern RPGs, the Mass Effect series is at the top for me. It’s much better than Persona 3, Fallout 3, and even Skyrim. For the main games, you got fantastic cinematic storytelling, an extremely immersive universe, and most importantly, excellent characters that you really care about. It’s also interesting to see how the game evolved from an RPG similar to Knights of the Old Republic to an extremely competent hybrid of 3rd-person shooter and RPG, and when it was announced that it would have multiplayer, I was worried that it was the first potential sign that Mass Effect 3 would not be as great a game as the first two. To my surprise, when the demo was released and multiplayer was open to everyone, it was fantastic…! Intense game play that plays EXACTLY like Mass Effect 3’s single player campaign, strong co-op, and a really fun experience, the multiplayer certainly has a lot going for it.

Mass Effect 3’s Multiplayer has you playing as part of a squad whose task is to survive wave after wave of enemy forces until an Alliance shuttle can extract you and your squad from danger. You and three other players have to survive ten waves of enemies, with special tasks to accomplish at the 3rd, 6th, and 10th wave. These usually involve deactivating/activating 4 targets on the map, or fortifying a specific location to allow/stop the upload of intel, and after the final wave, you fortify your starting location for 2 minutes until a friendly shuttle can pick you up and end the mission. At this time, there are only two maps with three difficulty levels, but it’s still fun to play.

What’s great about the multiplayer is the sense of teamwork you get from each match as you need to work together in order to survive. It is possible to play by yourself or with one other person, but the maps do not adjust the amount of enemies in relation to how many players are in a single match, especially since the enemies are actively pursuing you in Mass Effect 3, unlike Mass Effect 2 in which the majority of enemies only advanced when you moved from your position. In order to win, it’s best to have at least 2 other people to back you up. At the end of each match, you get experience to level up your character and credits to buy different packs of items, which include weapons, mods for your weapons and armor, weapon upgrades, consumable items, and the ability to unlock further customization for a specific class.

When you start multiplayer, you choose a class and then you choose a character. There are 4 characters to each class: Two humans (Male and Female) and two aliens. As of now, only one character is unlocked, and I’m assuming that as you buy more item packs, you can unlock the other characters. Each race per class has unique abilities, so if you want a specific power set, try to unlock that character as you play more of the game. After you name your character, you can adjust his primary armor color and highlight color, with other customization options waiting to be unlocked.

Afterwards, you’re brought to the character menu in which you can choose and upgrade your powers like in the main game, change your weapon loadout as well as mod your weapons with scopes and other add-ons, add special enhancements for a single match via the Equipment option, or buy more item packs from the store. With weapons, you can only equip two guns total and you can’t carry two of the same type (IE, can’t carry two shotguns at once), but you can choose whatever guns you like, so it’s a good balance. One disappointing thing is that while you can create more than one character per class, you can’t delete your character. If you’re playing a human, you can move to the other gender since humans have the same skills in each class, but if you mess up with any of the other races, you’re stuck with a bad setup, and at this point, I don’t know if there is a way to re-adjust your powers.

When you’re done perfecting your character, it’s time to join a match. You’re able to join any match via Quick Match, create a new match and see personal and global leaderboards. Regardless of whether you choose quick match or create new match, you get to choose your map and your difficulty level. With creating a new match, you can choose to make it public, so anyone using quick match can access your lobby, or private, so that only your Origin friends can access the room. You can examine mission settings, adjust your character settings as if you were in the character screen, and adjust options here.

When you’re ready to play, click “Ready”, wait for everyone else, and in 5 seconds, you’re dropped into the match.  Another disappointing note is that there’s no general lobby where you can pick and choose player rooms, so you can pick the ones with a decent internet connection. When I used Quick Match, the hosting player’s internet connection was unstable half the time, which meant plenty of lag and matches ending prematurely when the hosting player is disconnected. This is probably the most disappointing part of the Multiplayer, and I hope that when the full game is released, there is at least an option to pull up a general lobby to pick your matches.

All in all, the multiplayer for Mass Effect 3 is very solid, and it is a good example of how to do co-op multiplayer well. The aggressive enemies and increasingly difficulty help reinforce working together as a team, and that is definitely the best part of the multiplayer altogether. It also feels more immersive than the main game at this time since you are playing as your own character in the Mass Effect universe rather than your version of Shepard. However, the disappointments that I pointed out will definitely turn off some players, especially those who play mostly for the multiplayer. Bioware/EA has at least some time to fix these issues, and if not, there will hopefully be a patch that addresses this in the near future. I definitely recommend checking out the single player campaign before you dive straight into the multiplayer, just so you can get an idea of how it works. You can download the demo and get more information about Mass Effect 3 at masseffect.bioware.com.


When some of the voice actors were announced for Mass Effect 3, a particular name caught many by surprise: Jessica Chobot. Yes, that Jessica Chobot of IGN and G4 fame (among others). I am not one of the many who are hating on Jessica due to her fame. That would just make me look like I was jealous that I wasn’t picked to be in a video game. The thing that is making me a little disappointed is that Jessica Chobot works in the field that reports on gaming and has influence on what people think about everything in the gaming industry on the consumer side.

It’s disingenuous to preview a game only to be announced a week later that your voice and likeness will be in that highly anticipated video game. It casts a grim shadow of doubt on anything you have to say about the game. Unfortunately, it also casts that same shadow on the publications you work for at no fault to them. One could argue that her employers had to have known that Jessica Chobot was going to be in Mass Effect 3 since she had to spend a lot of time in recording voice sessions and that type of thing is kind of hard to have go unnoticed.

Jessica Chobot went on Twitter to reassure people that she will not be involved in any of the review process for Mass Effect 3. As much as I think it’s a bit drastic, I think that IGN and G4 should refrain from reviewing the game and any DLC that will accompany Mass Effect 3. No matter what both companies do, no one will believe that they are not being paid off for their review scores or biased to give it a good score since one of their own is in the game. Most gamers already believe that gaming press gets paid off to begin with, even with no proof. Conflicts of interest like this, in my eyes, makes those far-fetched theories seem more of a reality.

It’s not like having someone from the gaming press in a video game hasn’t happened before. Dan Ryckert from Game Informer was asked by Team Bondi and Rockstar to be a character in L.A. Noire when Dan and fellow editor Matt Helgeson went to do a cover story for Game Informer magazine. Dan Ryckert never participated in any of the review process for L.A. Noire but did give his impressions on the DLC “Nicholson Electroplating” for the game. Although it was a pixilated version of Jim Sterling, he was a playable character in The Blocks Cometh alongside Destructoid’s mascot, Mr. Destructoid. From what I gathered, Destructoid did not review the game.

When it comes to journalistic integrity, I like how Giant Bomb handled Bastion. They took a stance of not reviewing Bastion due to how close they were to the production process and the team. I know that is different than actually appearing as a character in a video game but it still shows how much thought they put into how this would all be perceived by the public and they took the proper steps to distance their outlet.

Do conflicts like this occur in film and television? What about the world of publishing? I keep asking myself, “how can anyone see this as being okay to begin with?” and I impose the same question to you. Can you still trust an independent outlet or company’s objectivity in reporting on a video game when they’re image is now in part synonymous with it? Do these sort of actions make erode their professional credibility in the public eye?

Elizabeth “Kitty McScratch” Bolinger is a surprise guest that I really had to have on the show. She currently holds 103 registered world records in dance and rhythm gaming (and claims to have another 100 that are still being submitted). The Guinness World Record people contacted Geekscape about talking to Elizabeth and since Geekscape always needs more gamers and female subjects, I thought it would be a great idea. I think you will too! We talk about record breaking, old school games versus new school, if videogames cause violence, being hit on by guys online and a ton more! Enjoy!

Find it on iTunes

The year was 1999 and iD Software had just released their new game: Quake 3. Considered to be one of the best games ever for competitive play, it has far outlived any game. To this day, it is still being played in big name tournaments such as Electronic Sports World Cup (ESWC).

But even though Quake 3 is still going strong today, iD took a step back and decided to release something new, something different. Instead of a new game that would be released in retail stores, or downloaded online via Steam or other online distributors, iD decided to release a free ad supported game, playable via a browser window with a bit of a graphics update. Personally, I’m interested in how this will play out in live competition since I’ve played a few games competitively already. We’ve all seen Quake 3 in nearly any video game tournament, but this could be a chance to bring death-match back to the competition scene without the use of console games or even Counter Strike.

First off, if you have never played Quake or any other first person shooter (without mentioning that you’re living in a cave), the idea is basically this – you go around the map collecting weapons, health, and armor while killing (fragging) the enemy. For first person shooter games there are three main game types – 1v1, where you and another person go head to head and who gets the most kills wins. Team death-match, usually comprised of two four-person teams and who gets the most kills wins. And last, capture the flag, with two five-person or so teams compete to capture the other team’s flag and the team who captures their enemy’s flag the most wins. It’s very fast paced and the movement alone is something that can take years to master let alone using the weapons.

Now when I say playable from the browser, you really do play from the browser. It downloads the files onto your hard drive and when you hit play it takes you to a page where it then runs. However, just because it’s played from the browser doesn’t mean it has features you’d come to expect from stand alone first person shooter games. It still has all of the settings you’d want plus more for the more advanced player. Surprisingly, there hasn’t really been much of a difference that I’ve noticed between the browser and stand alone game. The mouse doesn’t seem as smooth as a standalone game, but you can adjust the mouse sensitivity to help with that. They’ve even added lag support, which basically increases the hit-box of your enemy if your ping is too high so lag won’t be much of an issue. Pretty good for a browser based game.

Hopefully, Quake Live will breathe a breath of fresh air when it comes to competition. Death-match can make a much welcome come back. Quake Live is currently in development as a private beta with constant updates. No release date has been announced yet but here is a trailer from the E3 announcement:

Right now, I like what they’re doing with it. ID is providing constant updates and improvements. The only thing that can still really be improved upon is the addition of more servers. It seems that the game is operating on all of IDs servers, so it’s currently not clear if someone can make their own dedicated server or purchase one from a company that supplies them. Personally, I can really see this game going far. With the fact that it’s a free application, the presence of a ton of people can really open things up for some massively promising competition.


This week, we continue with the Equipment Series with the Gravity Lift and the Power Drainer.


GRAV LIFT(Duration – 30 Seconds)


Tip #1 – MAXIMUM OVERDRIVE

The Gravity Lift is a lifesaver of many flavors. One of its flavors tastes like the ability to divert a fast-moving vehicle before it’s too late.

When being pursued by an enemy vehicle you can quickly use the gravity lift to make the enemy fly over your head as if they were a banshee. This will leave your opponent feeling like they’ve just been roofied, which gives you plenty of chance to take advantage of their vulnerability. Fire away my friend. Fire away. We regret that refererence wholeheartedly.


Obviously, this tactic will only work with vehicles that don’t already fly. Once used, you turn what someone thought was going to be a hit-n-run into a fly-n-die.


Tip #2 – THE TRAP

The Gravity Lift may also do trap and disorient an enemy on foot. iIn order to either trap them or throw off their accuracy, here’s what to do:

When you’re in a room with a low ceiling and an enemy is heading towards you, quickly deploy a Grav Lift and soon enough you’ll see your very own Marry-Poppins. Kill Marry Poppins.

This also works outside, as a Grav Lift is unexpected from your enemy as a defensive tactic and it will throw off their accuracy during a chase or a battle.

If you are ever dumb enough to be caught in these traps, simply use a grenade to destroy the Grav Lift. Throw it down and it should be taken care of.

Note: Use a Frag Grenade. Using a Plasma Grenade is very risky, because many have been known to just give themselves homemade, ‘splodin butt plugs.


Tip #3 – GET ‘EM HIGH

So obviously the Grav Lift can lift you to higher places and get to mom’s cookie jar. Also, try using the Grav Lift to get a vehicle to a higher area to reach a goal or a shooting spot.


Doing this with a vehicle does take a higher level of skill, so if you are under intense heat just use the lift for a getaway – or use it to find a better sniping position that you wouldn’t normally be able to get to.


Power Drainer (8 to 10 Seconds)

Tip # 4 – I’VE GOT THE POWER!

Ah, the Power Drainer. How Annoying is this weapon? This isn’t something you want to become friends with unless you are the perfected user. It takes out an enemys shield just about instantly so fire away at them or use a combination of a grenade so that the life-sucking aura around the drainer is destroyed as well as the enemy. Be careful not to get caught in it yourself – otherwise you may end up the person with the life sucked out of you. Insert ex-girlfriend joke here.


Tip #5 – PEE ON EVERYTHING THAT’S YOURS

You can also use the Power Drain to mark your territory. If you want to get to a certain spot, but can’t do so before some of your enemies. Set up a Power Drainer so that if they want to get to it, they’ll have to deal with metal through their skulls.

Let’s say you’re gunnin’ for a brand new Sniper Rifle: throw a Power Drain in the direction of the weapon to divert the opponent away from it. Throw a grenade at the Drainer to destroy it instantly and then gingerly walk over and grab your prize.


Tip #6 – DRAIN YOU

Furthermore, the Power drainer is superbly effective against all vehicles. It stops them for five seconds as well as taking away your enemy’s shield. So as soon as you disable a vehicle with a Power Drainer you should fire away at the vehicle. You may then make your getaway in their vehicle and go off to kill some bitches. See? Who needs GTA IV?

Warning: the weapons system still works on vehicles even when they are disable by a Power Drainer, so make sure those using the weapons on the vehicles (for example, the guy using the turret on a Warthog) are taken out first because obviously the driver isnt going anywhere.


Things to Remember:

1. The Grav Lift can be used for more than just getting high. To high. Places. You know.

2. The Grav Lift can divert all ground-based vehicles, but that doesn’t mean you can challenge tank with a Grav Lift. Unless you’re having a bad day. If that’s the case, go for it, Champ.

3. The Power Drainer stops any vehicle and makes anyone an easy target, including you.

4. The explosion that follows the Power Drainer’s release can kill. Watch it.

5. Use the Power Drain to mark your territory, or to set up a mini holocaust.


This week’s Teabag Prevention article was written by:


This week’s Teabag Prevention article, as always, was edited by:


For any comments, suggestions, or inquiries please email us at:

TeabagPrevention@gmail.com

And don’t forget to add us on myspace at:

www.myspace.com/teabag_prevention

Setting your mind close to seven years ago can be a tough thing to do. You may have been a God at Halo: Combat Evolved, but are you a God at Halo 3? We here at Teabag Prevention believe it is our duty to help you walk on water again in this gift that the Bungie team is giving us on this very sunny and glorious Bungie Day – the reimagining of the Halo: Combat Evolved map Chill Out.

Back in the LAN party days, gamers were able to play without the lag, actually talk face to face, and sharing a tv was a must. Chill Out is a pretty small map which is recomended by bungie to be played by 2-8 players. “Screen-cheaters” would have had it easy.

Fast-forward to July 7, 2008. Have things changed? Xbox Live brings on a new generation and a new way of playing. The map may be similar, but will the startegys stay the same?

THIS BUNGIE DAY: HOW TO NAVIGATE COLD STORAGE

Tip #1- Know Thy Surroundings

If you’re not careful, it’s pretty easy to get lost in Cold Storage during your first games. Use distinct landmarks such as: teleporters, weapon spawns, and places around the map that catch your attention. A few things that WILL catch your attention are:


Tip #2 – The Spawns

For instance, if you remember Chill Out fairly well, then you’ll be happy to hear that the Overshield, Active Camo, Rocket, Frag Grenade, Plasma Grenade, Shotgun, Plasma Rifle, and Assualt Rifle kept their spawning locations. New to the roster are the Equipment spawns and the Battle Rifle spawn.

The Needler is located on the oppisite platform as it would be on Chill Out. Not a major difference, but one that can decide life or death.


The Bubble Shield is located just above the center of the map.


The Regenerator is found just below the Plasma Rifle spawn.


The Power Drainer can be picked up not too far from the Frag Grenade spawn by the Flood in the tube.


The Battle Rifle spawn can be found a few paces south (toawrd the center of the map) of the Bubble Shield spawn.


The Overshield is located not too far from the Shotgun spawn.


The Active Camo is located in the same room as the Sniper Rifle.


Tip #3 – Use that Needler!

Since Cold Storage is a fairly small map, using a Needler can be key to being on top of the scoreboard. There is a hallway leading up to the needler spawn point that can be used as cover from enemies below.

Be weary of greades for they are deadly in close quarters. If they don’t know you’re up there, and you’re sitting up there giving deadly pika-boo to your enemies, you have full rights to laugh your ass off at them.


Tip #4 – Teleporters

You may end up behind one or more unsuspecting enemies if you use the teleporters correctly. An example of using the teleporter system strategically would be using the teleporter behind the Plasma Rifle spawn. This puts you in the same location as the Active Camo and the Sniper Rifle.

Just try to make sure no one else is waiting on the other side. Only then will your plans for slaughter be successful.


Tip #5 – Cheek to Cheek

Cold Storage is a close-quarter map. The Sniper Rifle should not be used frequently unless you’re decent at no-scoping (see Teabag Prevention article #1). Weapons such as Rockets and Shotguns fit the map perfectly.

During a Free-For-All match, getting to the Rocket Laucher first can be key at achieving victory – at first.

Shotguns play an important role too. They kill at close range, are the easiest weapon to use in the game, and they disable an enemy’s shield with one shot. If you’re going up against someone with a Battle Rifle or Assualt Rifle, you should be able to win – if you’re close enough.

If you can’t get your hands on these weapons, it might be best to just stick to your Assault Rifle. Use Equipment to change the field of battle also. There are many ways of going into battle, but there are many mistakes. Here’s one:


Equipment can be very dangerous here, because the map is so close-quarters that you may very well use them against yourself accidentally. Be careful of this, Happy Bungie Day, and have fun!

Things to Remember:

  • You WILL lose if you don’t utilize your sorroundings.
  • Close-quarter combat is a must. Equip the necessary weapons.
  • Equipment can change the field of battle.
  • Know your weapon spawns.


This special edition of Teabag Prevention was written by:


This special edition of Teabag Prevention as always, was edited by:


For any comments, suggestions, or inquiries please email us at:

TeabagPrevention@gmail.com

And don’t forget to add us on myspace at:

www.myspace.com/teabag_prevention 

Also, join our new Facebook Group!


Happy Fourth of July, Scapists. We never rest here at Teabag Prevention because neither does the enemy. We’ve decided that a lot of you probably don’t go outside for anything, even if your parents tell you to. You’re rebels like that. So we’ve been kind enough to make this second part of the Equipment Mini-Series explosion-based to commemorate our country’s independence, happiness, and affinity for exploding the other team.


THIS WEEK: THE TRIP MINE (85 Seconds it detonates if not already exploded)

Tip #1 – HAVE A NICE MINE!

The trip mine is the only Equipment item that directly kills opponents or vehicles. So take extreme advantage of this and also be very wary of its capabilites. When you hear a beeping and see an orange light, pay attention and be more attentive – you’ve got some ‘splodin to do. When playing in teams, always make sure to let your teammates know that it is around – otherwise you may get an accidental triple betrayal. There’s no achievement for that, no matter how cool it sounds.


Tip #2 I’LL TENDERIZE ‘IM!!!

When in a situation tighter than your sister’s jacket, the mine can take out enemy vehicles instantly. The vehicles might need a little tenderizing first, but once you lay that mine, a kill is in reach. Be sure to stay away from the vehicle, when doing this, because even though the blast should kill it and its passenger, you may also get caught up in that explosion.

TIP #3 DO IT AROUND PEOPLE

The Trip Mine can also be used to your best advantage in Flag/Bomb/or Big Team Battle games. Here’s how: plant your Trip Mine right at the base of your Flag or Bomb and make it so that an unsuspecting enemy goes for the victory Flag journey or for the Bomb arming and he ends up getting ‘sploded instead. That’s right. ‘Sploded

TIP #4 LISTEN ALL Y’ALL IT’S A SABOTAGE!

In Big Team Battle maps such as Valhalla you can sabotage the vehicles, or even items, using Trip Mines before anyone ever gets to them. You’re setting a booby trap. We said trap.

Here’s one: throw the Trip Mine under a vehicle so that the beeping and orange light are muffled and relatively unnoticeable. Once someone turns on the engine, it doesnt purr anymore. It will ‘splode

TIP #5 EXPLODE FROM WHEREST YOU CAME, MONSTER!

The simplest option with the Trip Mine is to lay the mine exactly where it is spawned. Anyone in a rush, at the beginning of a match, trying to go around the map picking up their favorite weapons before going out and Slaying might accidentally pick it up and do some ‘splodin. You’re really counting on someone’s stupidity here. Luckily, it won’t let you down.

TIP #6 BUBBLE TRAP
Combine the Trip Mine with a Bubble Shield. Here are two ways in which this can be effective:

1. When someone is in it just throw a mine during battle or while they are chasing you and it’ll explode with the full force of the Lord inside the Shield while you are perfectly unharmed. Just like in last week when we combined grenades and bubble shields.

2. Smarten up and in a congested battle situation, where most people will be running around like headless chickens and looking for safety from vehicles or crossfire, lay down your Trip Mine in a deployed Bubble Shield. Someone is bound to need the cover and accidentally step into their own private Michael Bay-level explosion. Warning: make sure you, or your teammates, don’t need the cover first.

TIP #7 NOT SO HARD TO KILL

 Now that you know exactly how gruesome, how dangerous, and how unbelievably risky laying down this important and amazing piece of equipment is you’re probably thinking “it’s too powerful…it’ll become sentient…it’ll destroy us all!” Well, don’t worry my Skynet fearing friend, you can destroy a trip mine by doing the following:

1. Shooting it a little bit.

2. Throwing a grenade at it.

3. Convincing a suicidal Spartan that it’s a good idea.

Note: You may also use these ways to kill (and therefore detonate) the Trip Mine to set traps from afar. When someone is near it and thinks they are safe, you may be on the other side of the map, waiting to shoot it and detonate their face. You may also use this trick with vehicles.


Things to Remember

1. Trip Mines take a very long time to detonate unless tripped – 85 seconds to be exact.

2. These things force you to be smart. Set traps, don’t throw them around yourself or you’ll seem more suicidal than Sean Kingston.

3. Make the Trip Mine’s disadvantages your advantages. Kind of like when you’re in a relationship.


Please tune in Next Week for the end of the Three-Part Equipment Mini-Series where we finish you off…er…give you tips on Grav Lifts and Power Drains. Same Bag time, Same Bag channel. Now go to your barbeque and tell girls that don’t care what you’ve learned today.

This week’s Teabag Prevention article was written by:


This week’s Teabag Prevention article, as always, was edited by:


For any comments, suggestions, or inquiries please email us at:

TeabagPrevention@gmail.com

And don’t forget to add us on myspace at:

www.myspace.com/teabag_prevention


In the months before Halo 3’s beta release, the mysterious “X button” fuction plagued the interwebs. Ridiculous rumors were spread far and wide. Once it was even believed that its function was to steal an oppenent’s weapon while it was attached to their back.

Then, we were told that this new function would change the way Halo is played. This left many wondering if a 3rd person camera view was open to a push of a button. After videos of leaked footage emerged, we soon found out what the answer was.

On May 16, 2007, Halo players were giddy to use this…


THIS WEEK – EQUIPMENT

BUBBLE SHIELD

Tip #1 APARTMENTS FROM THE FUTURE!…

Use the Bubble Shield as a means of getting closer to your opponents or to your most prized weapon. When you’re in an area that’s hot like mama’s freshly baked cookies and you want to get there, use the Bubble Shield as a ways to extend your safety. Toss it away from yourself and as far forward to your objective as possible. To do this, look up into the sky and toss it into the air. Once you’ve deployed it, and reached it safely, you will be nice and cozy in your new temporary home.


Tip #2 – …THEY ALSO COME WITH LIFE INSURANCE POLICIES!

When you’re low on shields and being chased by the man it is always a good idea to deploy a Bubble Shield to or near your destination, just like the above tip. The difference here is that once you see your opponent approaching you’re going to toss a grenade of any sort inside your own shield…

Jump out once your opponent is in in. You are now on the offense. The shield will explode, along with their face. You have now handed out some Exploding-flavored pain to them while you remain completely unharmed. Your next move is to then jump back into the fight and finish the yorb since they are now completely helpless – if they’re not already dead, that is.

Tip #3 – BITE OFF WHAT YOU CAN CHEW

Bubble shields do not stop road rage so DO NOT use them for protection against mobile objects themselves. DO use them against a vehicle’s weaponry. When under heavy fire from a vehicle you should toss a shield, while avoiding the vehicle of course, and either “stick em” or raid their vehicle. It is protection against the vehicle’s fire power, not the vehicle itself. Don’t just stand there, shoot the bitches.

And hope for the best…


Note: The Bubble Shield lasts for a total of 20 seconds.

REGENERATOR

Tip #4 – A SNIPER’S BEST FRIEND

This handy tool gets put to good use in long-range combat situations. Let’s say you end up without any protection and all you have is a sniper rifle. This will keep your shields in tact and provide extra support under fire so that you are very powerful (but not invulnerable) when taking out your enemies from afar.

Also when things become close range, you can still use the sniper to get a no scope and melee. Whenever in a hand-to-hand fight in a regenerator, you have the higher advantage of defeating the opponent if you fire at them first and then whack. Fire then whack. Fire. Then whack. Or just two consecutive whacks. Just make sure you keep your whacking high, otherwise you’re done for…what?

Tip #5 – EXPLOSIVE, BUT DEADLY…

Unfortunately the regenerator doesnt have the speed to heal you when you are hit by explosives, so the more explosive weapons like Rockets, Grenades, and The Brute Shot are more capable of killing you while you’re in a regenerator. Be wary of that.

High powered or high rated firing weapons, such as the Machine Gun Turrent or Needler, are also capable of killing you in the regenerator. These must be used to their full potential, though. Here’s an example of me using a grenade to its fullest potential…

Not so safe now, are you?


Notes:

Using the regenerator as an added element of surprise in long-range battles works great. So does staying with a teammate and actually using the regenerator selflessly to heal.

You can still die under fire by BR’s and/or Carbines. Needlers are the quickest and most effective weapons when playing against someone in a Regenerator.

The Regenerator also lasts a total of 20 seconds.


Teabag Prevention Bonus Tip!…THE FLARE

FLARE

Tip #6 – OH TAKE A LOOK AT ME NOOOOOOOOOOW!

Much like Phil Collins, The Flare is taken out of basically all of matchmaking – so this tip will be mostly for you custom matches fanatics. We see too many people misusing these, so here’s how to be smart about The Flare.
The Flare obviously takes out your vision. That is its only function. What you’re left with after you deploy or are faced with a Flare is that it does not take out your radar and your reticule or crosshair. The crosshairs will still turn red when an enemy is in them. Take advantage of this when under the Flare’s warming light. Stop looking in front of you and use only your radar and crosshair. This is the best defensive tactic in a Flare situation aside from just leaving the affected area.


Tip #7 -DON’T LOOK AT ME WHILE I’M SHOOTING YOU

When you have a short ranged weapon or uber powerful one, use the Flare to disorient your opponent, but pay attention to where they are or where they are heading because you will be slighlty blinded yourself. So once the Flare is in effect, blast away my friend.

The Flare is also very effective in large groups or flag/bomb games. See a bunch of people guarding the flag? Throw the flare down. By the time the Flare’s gone, their flag is too. Just make sure to divert your own eyes – the Flare will blind the player who throws it, too (we can’t stress this enough).

Things to Remember

1. Your Bubble Shield will help you get places unharmed. Not camp out.

2. Bubble Shields will protect against vehicles’ weapons, not the vehicles themselves. Use this to defeat vehicles.

3. Whack off inside a Regenerator.

4. Needlers will kill people in Regenerators. So will Rockets. And Sniping. And well-thrown Grenades.

5. Flares will blind you too, so make sure you’re looking at the right stuff – Your Radar and Your Crosshair.


This week’s Teabag Prevention article was written by:


This week’s Teabag Prevention article, as always, was edited by:


For any comments, suggestions, or inquiries please email us at:

TeabagPrevention@gmail.com

And don’t forget to add us on myspace at:

www.myspace.com/teabag_prevention

Week 10 already? My God it’s seemed like longer. We here at Teabag Prevention would like to say thank you for reading Weeks 1-10 (and if you haven’t, then this is a not-so-subtle hint telling you to do so, asshole) of Teabag Prevention. This is not the end (well, it is the end of this chapter), but the beginning – as this is only the first chapter in how not to get some Spartan balls in your face.

We’re going to end it the way you start out most games. Not with a whisper, not with a bang, but with an Assault Rifle.


THIS WEEK: THE ASSAULT RIFLE


TIP #1 SHORT BURSTS OF LOVE

The Assualt Rifle is most accurate when being shot in short burts of fire. Holding the trigger down is going to provide you with more misses than hits. When shooting an Assault Rifle at mid-range (for lack of having a better weapon in your possession *ahem*!), you are going to have to shoot in short bursts.


TIP #2 OVERCOMPENSATE FOR YOUR INADEQUATE ACCURACY

Due to the inaccuracy of the weapon, you may run out of bullets before your opponent is dead. If you run out of bullets completely your clip will automatically reload. If you are 100% sure that your clip will not kill your opponent, then the best choice you can make is your reloading time. If it seems like your opponent is not going to kill you with their clip, then you are very lucky. If this is the case, please reload before your oppoenent starts reloading. This will give you the split-second head start that will make the entire difference in a shoot out. Unless they have a Battle Rifle – in which case you’re dead.

Really, if you’re lucky enough to get the second chance to kill your enemy, don’t waste it.


TIP #3 HIT IT OR QUIT IT

An important thing to remember is when to melee. Too many gamers out there either melee too early or too late. It’s a common mistake. It’s also very important to know when your opponent’s shield is low enough to conduct a melee.

It takes about half an Assault Rifle clip to lower their shield…

…enough so that one melee can finish the job. Pimp slap that bitch. Hard. She gone done you wrong.


TIP #4 SPRAY THE PREMATURE HITTER! SPRAAAAAAAAAY!

If you see your opponent seemingly following the tip above, you can either continue with tip #3’s strategy, if you feel comfortable with pulling a Romeo + Juliet with him/her,

or you can take a step back and continue firing and finish your opponent off with the remainder of your clip.

Then snicker at their failure. Early meleeing will be the death of a lot of intermediate players. Take advantage of this.


Tip #5 …BUT I DID-NOT SHOOT-THE VEE-HI-CLE!

The Assualt Rifle doesn’t have an effect on vehicles unless the person(s) occupying them has their shields depleted or near depleated. For example, If a enemy Banshee is flying over you with low shields,you can try your short round burts, or, depending on how close the enemy is, you can go all out. You have the ability to kill whoever’s occupying that vehicle – BUT don’t be dumb enough to think it’s going to kill the vehicle itself. Slim to none, my friend, slim to none.


Another example is enemy in a Ghost. If the person’s shields are depleted, and driving away from you, SHOOT THEM!!!


Things to remember:

  • Like all projectile weapons, a grenade-projectile combo is always good. So, throw a grenade, lower their shields, and unload half a clip in ’em. That should do it!
  • Shoot in small bursts of fire
  • Reload strategically and compensate for the weapon’s inaccuracy.
  • Spray the shit out of early meleeers.
  • Works on vehicles only if thier occupants shields are low

Once again, thank you for reading the Weapons Series. This concludes your broadcast day on weapons. You should be able to kill all bitches with anything you see lying on the ground now. Go outside. Pick something up. Kill someone. Take it from us, it is perfectly acceptable!*


*Note: It is completely unacceptable to kill any human person. By outside we meant Valhalla. Go there. It’s pretty…
Indian Thing

This week’s Teabag Prevention article was written by:


This week’s Teabag Prevention article, as always, was edited by:


For any comments, suggestions, or inquiries please email us at:

TeabagPrevention@gmail.com

And don’t forget to add us on myspace at:

www.myspace.com/teabag_prevention

“War has changed.”

These are the first words we hear in Hideo Kojima’s highly anticipated Metal Gear Solid 4: Guns of the Patriots. They come from the familiar gravelly voice of David Hayter, the man behind our hero Solid Snake. This is not a mere statement of fact. This is a recognition by Snake that his time has ended; that he no longer has a place.

You see, Snake is not the same person he was the last time we saw him. He’s old. He’s beat down. He’s grown into that weary voice of his. He is still a lethal fighting machine but things aren’t as easy as they were before. Even with the aid of his new high tech muscle suit, we see Snake grunt, breath heavy, and rub his back. We see the added effort to do what used to come easily.

Snake is following in the tradition of our other great action heroes in his fourth outing (yes, I know that technically there are more than four). Indiana Jones, John McLane, and John Rambo have all returned recently with their own part fours. They all returned as old men facing new worlds. However, those films tried their best to show that these guys were not quite dinosaurs yet, that they could still hold their own and kick ass with the best of them. Metal Gear doesn’t attempt this. Sure, Snake does his fair share of ass kicking but you know from the outset that he has reached the end of his road. It’s kind of the whole point.

You see, war has changed. The battles waged by Snake, his contemporaries, and his mentors were battles fought with purpose and meaning. They were battles of ideologies, of good and evil, but they started a chain of events that has led to perpetual war. In this new world, war is the basis of all economy and it’s a self perpetuating machine. Wars are not fought with purpose. They are fought because, well, that’s what you do. The game makes a strong case that war needs to end, and as a result so does Snake. He is like the embodiment of war.

You may notice that this is a video game review, yet I’m five paragraphs in and have yet to mention any actual gameplay. Anyone familiar with the Metal Gear series should find this of no surprise. The series blurs the line between video games and movies. The story and themes of the game are just as, if not more, important than the game itself. The first Metal Gear Solid on the original Playstation brought a cinematic quality that had not been seen in video games before. This, along with its unique blend of philosophy, social commentary, melodrama, and low brow humor, really set the series apart and earned it a rabid fan base. Metal Gear 4 certainly comes through in this regard.

To try to summarize the story of Metal Gear would be a fruitless endeavor. To call the plot labyrinthine would be to give too much credit to labyrinths. I’m sure Jennifer Connelly had a much easier time making her way to David Bowie than I did trying to understand exactly what was going on, and I’m someone who has beaten all the previous Metal Gear games multiple times. Even a thorough scouring of Wikipedia did little to help.

However, that’s not to say the story is bad. This is billed as the last Metal Gear game (although there are hints in the cutscenes that more games are in development) and as such does a fairly good job of tying up the enormous amount of loose ends left by its predecessors. It also does a great job of infusing a sense of history and nostalgia into the proceedings. The games have always been self referential but this one is more reflective, more reverent. At one point it really hit me that, wow, I’ve been following this story for a decade now. It brought back memories of me as a high school freshmen, sitting in my best friend’s living room trying to figure out how the hell to beat Psycho Mantis. There is one chapter in particular that will really be a treat to long time fans. Does everything make sense? No. There have been too many twists and turns throughout the series for everything to come together neatly. So there are some plot holes, some questionable character moves, but overall the story here is wholly satisfying.

This is good because you are going to be spending a lot of time experiencing this story… a whole lot. There have been many rumors about the length of the cutscenes in the game, with some reports saying that some reach ninety minutes in length. It’s hard to give a specific length here because the game uses different methods to get the story across. You have non-interactive cutscenes, codec conversations, mission briefings, etc. However, if you count a “cutscene” as the period of time in between areas where you are fully in control then I can say that yes, there are a few cutscenes that exceed the hour mark. I would say that at least half of the game, probably more, consists of these story segments. Which, since this is a twenty hour game, means that you’ll be watching the game for over ten hours. If this sounds torturous to you then this is not your game.

So what about that other ten hours? You know, the actual game part. Well, it’s good, but maybe not as good as the story. Metal Gear has always been a somewhat clunky game. You often times feel like you are battling the controls just as much as you are battling the crazy bosses. The game is nowhere near unplayable, just a little unintuitive.

It also borders on giving you too much to do. Particularly given that you have so little time to actually do any of it.

The trademark gameplay aspect of the Metal Gear series has always been stealth. This became more difficult in the previous entry, Snake Eater, due to the lack of a radar displaying the line of sight of the enemies. Metal Gear 4 follows suit and eschews the traditional radar for something that just shows the location and general awareness of the enemies around you. This, coupled with the fact that enemies no longer follow a set pattern of movement, make it much harder to sneak around unnoticed. This is alleviated somewhat by the inclusion of a new camo suit that allows you to hide in plain site by blending your surroundings. However, this didn’t help me out much and I ended up in a lot of gunfights. Luckily, this tactic has become easier as guns and ammo are more plentiful than ever before.

The amount of weapons that you can pick up is astonishing and blows away any FPS you could think of. You are also able to modify these weapons by adding things like silencers, laser sights, or grenade launchers. This is all done using a new addition to the series, which is a weapons shop that you can visit at any time. Picking up weapons on the battlefield earns you point that you can use to buy new weapons, upgrade current ones, or just buy ammo. All of this weapon variety is nice but the reality of the situation is that you will find a few weapons that you are comfortable with and stick with those throughout. I never touched a large number of the weapons at my disposal.

You are also given some new toys to play with, like a little robot friend given to you by a whiny as ever Otacon. This robot can be camouflaged and sent to scope out an area before you make your way through. It can also be used to safely recover items from fallen enemies and can even incapacitate guards with a nice little electric tentacle to the nuts (did I mention the low brow humor? There is also a hairless monkey addicted to soda and cigarettes, yeah). This guy got very little use from me however.

Then of course there are the various ways to deal with guards. Take them in hand to hand combat, stick them up and rob them, use them as human shields, knock them out, tranquilize them, sneak by them undetected, distract them with porno magazines, or just shoot them in the head (my preferred method).

The point is, you have a lot of options on how you play the game and while it’s great to have this at your disposal I think a more streamlined approach might have been more satisfying and less unwieldy.

I can’t finish this review without talking about the graphics. Metal Gear Solid 4 is an absolutely stunning technical achievement. I used to be a big fan of pre-rendered cutscenes (something we see less and less of these days). One of the reasons I played through games like Final Fantasy and Resident Evil was to get to the next cutscene. I dreamed of a day when the game I was playing looked as good as those cutscenes did, and now we’re there. All the cutscenes in MGS4 are done with the in-game engine and they look every bit as good as the pre-rendered scenes of old, only this time the game doesn’t switch to an inferior looking game after the scene is over. The transitions from cutscene to gameplay are absolutely seamless here. So much so that you’ll sometimes not even realize that the game has started. It’s a wonderful effect, especially during some intense chases that turn into incredible on rails shooters. The motorcycle chase through eastern Europe is one of the coolest looking action scenes I’ve ever seen… and I got to play it.

The production values of the game are top notch all around. Everything works together as a seamless whole. Everything from install screens (yes the game does have a few short install periods) to the amazing score is polished to a ridiculous extent. It’s a very impressive package.

At the end of the day, Metal Gear Solid 4 is an experience more than it is a game. It tells a thought provoking story, it wows you with its technical achievements, it plays on your emotions with powerful nostalgia, and it provides a pretty good game as well. Which is cool, I guess.

So if this sounds at all appealing then you would be doing yourself a disservice to not experience it. In my personal opinion this trumps other recent giant franchise games (GTA, Halo). Now excuse me while I start playing through it a second time.


Finding multiple dual wieldable weapons in the same area is like choosing between two blondes and two red heads. It’s ok to experiment, but if you choose the wrong combo you’ll fail miserably. Some combinations that may work for certain people can be disastrous for others. The following are just some examples of the different combinations you can choose from.

Note: you’re going to hear a lot about Plasma Rifles and Plasma Pistols. The reason why they don’t get their own tips is because of how common they in the grand scheme of combinations. Also, they are reffered to as: Shield disablers – aka the obvious choice.

THIS WEEK – DUAL WIELDABLE WEAPONS

Tip #1 – OPPOSITES ATTRACT


Dual wielding two of the same weapon MAY NOT be as good as a combination of two weapons. For example: If you pick up a Plasma Rifle and an SMG, you’ll be sure to take out anyone else holding two Plasma Rifles or two SMG’s. The reason? A Plasma Rifle’s purpose in life is to disable one’s shields

An SMG’s purpose in life is to simply penetrate you…as in your skin. Anyway, combine the two and you get a penetrating-shield-disabling combination of a kill.

Look how cute they look together!


Tip #2 – MAUL RATS


The Mauler can be the most annoying weapon in the game. One shot and one melee is all it takes to send you to Spartans (or Elite)Hell…and to possibly dine there as well (I’m sorry, we know how crappy that movie is..but it was there…it was late….)

So aside from it being annoying (or a window for annoying references), a Mauler can also rbe combined with other weapons for maximum effect. The Mauler is one of the “penetrating types” (as opposed to the “shield disablers”). Sure, it lowers your shield, but it acts like a small Shotgun. Combining this weapon with a Plasma Rife or a Plasma Pistol will give you the upper hand on disabling your enemy’s shield…

…it will also give you a straight shot at them. In this case, dual wielding Maulers can be a good thing, but only if you’re at close range. It’s usually not the best idea, though.


TIP #3 PISTOL P.I.


Ahh, the pistol…errr…um…I mean Magnum, you have evolved over the course of six years and seven months. Since the disabling of the zoom function, the Magnum has become a dual wieldable weapon. Though it looks bad-ass holding two Magnums, (even more so in Halo 2 because they’re jet black),


They aren’t very effective unless you get spot-on headshots. Even then, it can be difficult to score a kill.

To make it easier, pick up a Plasma Pistol up and use its charging capabilities to disable your opponent’s shield.

Once you’ve got that done, it’s pretty much a one-shot kill.


Tip #4 – I LIKE SPIKE


Spikers are part of the “penetrating type” family (that sounds horrible…), and yes it would hurt to be penetrated by a spike. Using this weapon with a Plasma Rifle or Plasma Pistol is a great combination to use.

Like the Maulers, two Spikers can be effective at close range. This weapon is a good one to use in any combination. It can go to medium range if needed, but keep in mind that the spikes have a slight arc.


So if you do go medium-range on someone’s ass, make sure you aim at their mid to lower back, like so:


And then, enjoy the results.


Things to remember:

  • A good map to test all these variations out would be: The Pit
  • One combination might not always work. Experiment with what you have.
  • Shield disablers + penetraition = WIN!
  • Shield disablers + Sheild disablers = LOSS
  • Double Penetration = Everyone Wins…


This week’s Teabag Prevention article was written and edited by:


For any comments, suggestions, or inquiries please email us at:

TeabagPrevention@gmail.com

And don’t forget to add us on myspace at:
www.myspace.com/teabag_prevention


Isn’t it funny when someone takes a laser pointer to a concert and makes it look like Tinkerbell is dancing on the lead singer’s junk? This is the one I wish someone would take to an American Idol taping. The Spartan laser is hell in a bottle. Get ready to start pouring it out all over your dead homeboys.

The Spartan laser, or “Splaser” as it is called by the biggest of dorks, has a few quirks to it that you need to get used to before you can dole out the damage. Here are some tips that will make it easier for you to make your friends inclined to call you a cheater.


This week in Teabag Prevention: The Spartan Laser

Tip #1: THEY CHARGE YOU BY THE HOUR

Much like Brian Gilmore’s average sexual encounters, the laser has a three second charge time that is required before every shot. Get used to it. If you somehow get into a cross map game of laser tag, knowing this three seconds deep down in your bones will keep you alive.


Tip #2: NO FREE REFILLS

The laser doesn’t use “ammo” like most weapons, but instead has a battery. A battery is full at 100 with each shot taking 20 away for a total of FIVE shots per laser. Keep track of these not only for your own laser, but also be sure to let your teammates know if you get taken out with the opponent’s. If you die via laser, then the opposing team can have no more than 4 shots left. Be sure to play on the conservative side until you know it’s safe for your team to start with the razzle-dazzle.

Another way to piss off the enemy with the laser would be to toss up a bubble shield. On maps like Sandtrap, it may be difficult for the other enemy to see the bubble shield from far away. Also, this may require Jedi reflexes:


Tip #3: USE A TRIPOD

The best way to use the laser is to plant your feet and follow your enemy. There is no need to “lead”, or shoot where your opponent is GOING to be, because it’s a fucking LASER right? Speed of light anyone? Anyone? Bueller? While this can be true, if you can anticipate where your opponent will be as opposed to where they are you won’t give them much chance to hide. While someone is “painted” (the laser is aimed at them and charging) they hear a distinct high pitch tone. Let them find out as opposed to telling them in advance. Here’s an example on my file share. I was pinned down by a fully loaded warthog, but anticipated their path and added two notches to my bedpost:

http://www.bungie.net/forums/posts.aspx?h3fileid=18056634

TIP #4 UNLEASH THE FURY

The same shot that you used to kill one enemy on foot could have been used to kill four people at once, blow up two vehicles, stop a bomb carrier, and get a killing spree. The laser is a POWER weapon, but only as powerful as you allow it to be. This is a clip of a friend of mine doing all of the above:

http://www.bungie.net/forums/posts.aspx?h3fileid=18066886


TIP #5 ABUSE PREDICATBILITY

Say you’re in a smaller map map, such as Construct, the laser isnt as good as a weapon as it would be if you were out in an open map such as Vallhalla or Avalance…or is it?

Walkng around with the laser, charging it even before you see the enemy, can be helpful. In the screenshot below, notice how the arrow is pointing to the midsection of the outer circle.


When they’re running out, you’ll have your laser charged by then.

Then…..

…they’ll have no choice but to walk into the light.


Things to Remember:

1. 3-second Rule: The laser takes three seconds to shoot. Plan accordingly.

2. The Laser has limited ammo, so use accordingly.

3. I’ve got the power! Make sure you realize you can stand still and aim accordingly (mostly on big maps).

4. Plan your kills accordingly. Use the laser to its maximum potential.

5. Anticipate your opponents’ trajectory. They’ll never know what hit them…until you do.


This week’s Teabag Prevention article was written by:

jake108 


Edited by:

Brian Gilmore


For any comments, suggestions, or inquiries please email us at:

TeabagPrevention@gmail.com

And don’t forget to add us on myspace at:


http://www.myspace.com/teabag_prevention


The needler is a small, dangerous, pink and sticky weapon. Don’t let the size of it fool you, because it is not the size that matters – it’s what you do with it. On this week’s Teabag Prevention, we teach you how to stick your pink in the right places.

THIS WEEK: THE NEEDLER


TIP #1 PINK ISN’T THE NEW ANYTHING. BLACK RULES.


Nobody likes to wear pink. Well, unless they’re a douche, nobody likes to wear pink. Don’t be “that guy”.

During a needler face-off the most important part of the battle is knowing how to dodge the sharp needles being thrust into your body.


if your enemy has The Needler as well, you need to either get

a) Closer to them, or

b) Farther away.

Doesn’t sound helpful? Here’s what we mean:

a) If you don’t move, you’re an easy target. This weapon is very deadly at medium to close range. Your best bet here, as their needles will follow your body everywhere, is to get to him before he kills you. You both probably started firing at the same time. Both of you will most likely die. It only takes a little over half a clip to kill you. Once it is – you’re toast; but so is he. You don’t want to tie up the score; you want to win. The best thing you can do in a N vs. N is to approach them until you can hit them. If you’re not dead yet and he doesn’t hit you back, then you will most likely survive. Otherwise, be ready to become the Juliet to his Romeo.

.

Note: When dodging at close range, dont run straight into it. It only takes about seven insertions to create a large explosive stink.


b) If you’re any father away than medium range, you’re going to want to move backwards. More importantly, though, you’re going to want to hit your opponent with everything you’ve got (simultaneously). Make sure to strafe left and right and maybe to even jump (just don’t hurt yourself by going off any ledges). By doing that, the needles will have less of a chance at hitting you (which is good).

If you don’t…

…you will die.

Note: Remember it only takes about half a clip to kill you. It’s not really important to tell you how many consecutive needles would kill you, because come on – who the hell’s counting those


TIP #2 WE ARE.


It is important to know your spawns in Halo, but it is almost equally important to know (approximately) how much ammo it takes to kill with each weapon and how much each weapon holds.


We already know that The Needler can kill you in a little over half of clip’s worth of shooting. The Needler itself can run out of ammo fairly quickly because of how fast it releases its bullets. The Needler magazine holds only 19 needles, so the maximum amount of ammunition consists of 95 needles. The needler is only effective when it you can empty about half your load into someone else. An under-loaded Needler is like a guy with E.D. – useless when it matters and in need of some serious medical attention.


TIP #3 SHERLOCK HOMING


The Needler has a slight homing ability, but it needs a little bit of guidance – this is where you come in. In order to use the needler efficiently, you need to predict your opponent’s dodges. For example, if they start strafing to the left or right, shoot ahead of them. If they start getting creative, try and “guesstimate” their trajectory and shoot there.


TIP #4 QUANTITY IS QUALITY


At medium range, empty your load quick and get out. It takes a lot of practice, but once you master getting as much of your clip into a person as possible while dodging their attacks, you will win battles against battle rifles, carbines and other mid-ranged weapons. The needler, if used correctly, can win any mid-range battle (might a little hard against rockets, though).


Note: Don’t try facing off against a sword with a needler at closer range at home…for now.

TIP #5 THAT MOVIE WAS HORRIBLE. DON’T REMIND US OF IT.


DO NOT USE THE NEEDLER ON A VEHICLE. HOLY CRAP. IT CANNOT BE STRESSED ENOUGH THAT THE ONLY RESULT YOU WILL GET FROM FIRING NEEDLES AT A VEHICLE IS MAKING IT LOOK LIKE A CHARACTER FROM THAT HORRIBLE SUPER MARIO BROS. MOVIE FROM THE 90’S.

Things to Remember:

1. Dodging is half the battle. Make sure you can dodge in a way your enemy won’t be able to predict.

2. Count on bad dodgers to plan their trajectory and pump them full of needles before they can kill you.

3. Keep your Needler fully loaded.

4. Keep dodging – The Needler is a great mid-range weapon.

5. Don’t make vehicles look like the pads on the Legion of Doom.

Get out there and use your Needler responsibly. Wow. That was hard to get through without making any immature penis jokes revolving around the color of the bullets and the fact that they stay inside your opponent. Let’s breathe.


This week’s Teabag Prevention was written by:

Edited by:


For any comments, suggestions, or inquiries please email us at TeabagPrevention@gmail.com And don’t forget to add us on myspace at:

myspace.com/teabag_prevention


Rockets no doubt cause explosions that leave those unfortunate to be near them massive damage, if not death, in their faces. The first and unspoken (yet not un-written) rule of Rockets is that splash damage (the damage caused by being near a rocket explosion – as opposed to a direct hit) is key to taking out just about anything with the Rocket Launcher. Sure, it’s always better to have a direct hit, but sometimes, that may not be possible – so you’ll have to enjoy that show next time. Thinking of a cheap semen joke? Neither are we. Welcome to Teabag Prevention: How to Suck Less at Halo Week #6

THIS WEEK: THE ROCKET LAUNCHER


Tip #1 – WATCH THEM SHOWER

If you have one of these fine pieces of weaponry during a team slayer match, your chances of getting an overkill or an extermination increase four-fold. One of the best things to do to the other team is to stalk them. We know what you’re thinking “Finally! This is legal!”. Well get ready for the stalk of your life because now that you have the rockets, you are a hunter. A stealthy ninja. You are not the 8ft. tall monster that you feel like. You need to use strategy and your cunning wit. You need to stalk your prey in order to get the possible best shot. There is a chance that your time to kill all of them at once may never come. But if it does, aim your crossair to the center of the huddle/squabble and hear that wonderful man’s voice say (at the very least) “Double Kill!”.

Remember: Splash Damage. Right in the middle.

It may not kill them, but that’s why you have two rockets before you have to reload. “Extermination”. Music to our ears.


Tip #2 – ROCKETS AGAINST THE MACHINE

Splash damage also works on vehicles that are light to medium in weight. These vehicles include: Mongoose, Warthog, Chopper, and Ghost. All of the above vehicles travel at a fast enough rate so that it can be hard to score a direct hit with a rocket launcher. This is why you should aim at the path ahead of the vehicle. Doing so will surely flip the vehicle or cause it to veer of its intended course.

Also, by doing this, you have a good chance at defeating the vehicle altogether.

Note: A mongoose may fly away and you may actually be saving this person from your wrath if your shot isn’t executed directly enough. To ensure death, make sure to shoot the person on the mongoose a little before unleashing your rockets on them.

Tip #3 PRE-EMPTIVE ‘SPLODIN

Take their important and potentially devastaing vehicles to the abortion clinic. Rockets have a use other than killing in Halo. In games where vehicles are very important and may give your opponents the upper hand, specifically in “Objective” games found in Big Team Battle, disabling the enemy’s vehicles will not only piss them off; it will instantly give your team the upper hand. Get rid of the vehicles before they’re even used.


Tip #4 BE PSYCHIC

Flying vehicles may be the hardest target for the rocket launcher. If you’re just crazy enough to try it because you’re a rogue spartan and your plan to foil the evil flying vehicle may be just crazy enough to work, then the best thing to do is to put your plan into perspective:

Imangine you actually go outside occassionally and that you’re a quarterback for a football team. Imagine there are no women involved. We know, We know. Bare with us. You’re a quarterback. The Banshee is your dumb-ass, yet more attractive and over-appreciated, reciever. You don’t know which way it’s going to turn. You think you know, but it may decide otherwise. In this case you’ve got to use your animal instincts (what A.I. should stand for) to make sure it makes that catch. Shoot in front of your target, but make sure you shoot at the place where you think the it’ll intercept – this may not necessarily be its obvious trajectory.

Once you think you’ve got ’em, zoom out and watch the fireworks.

Only then can you celebrate and feel good about yourself. This is extremely difficult to do – like your grandmother. And also like your doin’ sweet ol’ granny, the wait and the effort put into the end result will be well worth it. Ok that’s just disgusting.

Tip #5 TANK YOU VERY MUCH

Like step-children, tanks and wraiths can be difficult to deal with. They have tough armor and can probably kill you faster than you can kill them. The trick here is the same as with any other vehicle, aim at the path they’re going in. Luckily, wraits and tanks are much slower, so you’ll have to adjust your measuring. This should be extremely easy.

Be presistent. With enough direct hits, you CAN win – just make sure you stay out of its way and keep your distance. Apply Tip #1 and use your ninja skillz to shoot from a safe place. From Wraiths to Tanks, this should do the trick.


THINGS TO REMEMBER:

– Be stealthy. Plan your hits.

– Don’t go for direct hits on people – go for Splash Damage on people.

– Direct hits are for vehicles.

– Use this weapon against vehicles – and if you’re in an objective game, use it against vehicles even if they’re not moving.


This week’s Teabag Prevention was written by:


Edited by:


And for those of you who wondering if you should be working towards killing Mr. Gilmore, don’t worry you probably already can. He can kick your ass in “real life”, though -unless you’ve reached the national average height for men.


For any comments, suggestions, or inquiries please email us at TeabagPrevention@gmail.com And don’t forget to add us on myspace at:

www.myspace.com/teabag_prevention


It was introduced to us in Halo 2. It has claimed many Warthogs and even more lives of the ones who wield them. Calm down, back off, don’t kill yourself with that thing, make sure you’re being safe while using it and make sure it’s completely full before you waste its load. We’re talking about The Brute Shot and its best – and most practical uses- during this week’s Teabag Prevention!


THIS WEEK: THE BRUTE SHOT


Tip #1 – FASTER BRUTEYSHOT, KILL! KILL!

If you’re looking for a quick and squishy-sound-making kill, then look no further. The Brute shot has many advantages; one being a quick and dirty kill. This one’s easy and is only to be used when in close combat. It’s a one-two punch.

First, if you know you’re going to run into an enemy around the corner, get ready to kill that bitch.


Shoot once,


then melee.


That’s all it takes.


Tip #2 PLANES, BRUTESHOTS, AND AUTOMOBILES

Brute shots can be used for more than just the straight kill. The rounds that fire out of the Brute Shot are powereful enough to overturn a light to medium weight vehicle such as a Warthog or a Ghost. However, they are rather useless against Wraiths, Scorpions, Banshees, and Hornets.

If you’re playing an objective game on a large map, a Brute Shot may help with the many ground vehicles that you may come into contact with. But remember, it takes well placed shots to take down a Warthog.

A Warthog, for example, is farily easy to flip if you manage to land some shots under the Warthog.


Watch it flip and…..


Stare into their eyes like a betrayed lover in their last few seconds of this life, then….

…with a few well-placed shots, it should go up in flames faster than my last relationship!


Tip # 3 BEWARE OF THE HEAVIER ONES: THEY ARE A WASTE OF YOUR TIME. MOVE ON! NO…D-DON’T…GOD DAMMIT…

It’s not a good idea to charge heavy vehicles with a Brute Shot. Sure, it may do some damage, but they’ll kill you faster than you can kill them. Things not to try to kill are:

Banshees

Hornets

Wraiths

Scorpions

Choose your battles wisely. It’s like when you choose to not correct your girlfriend’s malapropisms during a fight. It’s not worth it and you can win, and live, more effectively by moving on.

As you can see here, you can try your best to escape the inevitable,


But they’ll most likely always win. And even if they don’t, you shouldn’t be going into fights you know you can’

…deal with it.


Tip # 4 YOU CALL THAT A KNIFE?

Things are a little differnt when it comes to meleeing with a Brute Shot. For those of you who didnt notice the large blade on the weapon, proceed to notice it now. It’s huge. Seriously. Look at it. You didn’t notice that? Come on now.

For a regular weapon, it takes a couple of melees to do the job. With a Brute Shot, a jump and a melee at the same time will knock out an enemies shields rendering them one-shot kills.


If you’re playing a Team game, this can turn into a great assist. If not, it’s your choice on how to finish the job. You can hit them with your body or give them a quick shot to the body or face.


Tip #5 TOTALLY STRAIGHT. SWEAR TO GOD.

Unlike most other weapons in the game, The Brute Shot does not fire at an arch. Once you aim the crosshair at something, it’s not going to fall short or drift off into another direction. It’s going to go where you are pointing. This makes the Brute Shot a great medium-ranged weapon.

As seen here, all you have to do is keep the crosshair on your oppenent, wait for it to turn red, and you’ll be in for a kill.

Tip #6 TAKE THE BOTTOM

Now, its importnat to keep your crosshair on your targeted enemy at all times, even when they’re jumping around like kangaroos – which works great in Halo, but will make you look like a jack ass in most other games; or in real life. This ties in with Tip #4 simply because the fact that the Brute Shot does not have an arch comes into play. When firing at an enemy thats jumping from a position higher than you, you may want to aim below that person so that the grenade will hit them.

With persistent hits (about 3 dead-on shots or 4-5 general hits), you will eventually kill them.


s

Things to Rememer:

-The Brute Shot has no arch to it

-It proves to be a tide-turner when in combat with ground based vehicles other than tanks

-Has a melee advantage (the huge blade that makes up most of the weapon)

-Pick on something you know you can destroy.

Now that you know more about how to not kill yourself with this weapon, go out and use it. It really is an extremely straight-forward weapon. Don’t you wish girls (or men, whatever you dig) came with instructions this easy? Thanks for reading! See you next week.


This week’s Teabag Prevention was brought to you by:


For any comments, suggestions, or inquiries please email us at TeabagPrevention@gmail.com And don’t forget to add us on myspace at:

www.myspace.com/teabag_prevention

Halo 3 presents you with a palette covered in paints. Most of them naturally draw the human eye. The brilliant hues of the Spartan Laser and the calming shades of the Energy Sword make for very elaborate and fanciful works of art. While you use these paints to astonish your friends there are those of us who prefer using the other end of the color spectrum and, while these colors may be perceived as bland, we view them as beautiful. As much as many deny it, grenades are without a doubt one of the most devastating weapons in any Spartan’s arsenal (I emphasize Spartan, because if you use the elite model you should take your copy of Halo 3 and throw it straight into the garbage. Seriously). There can be no light without dark, and we think any true Halo artist must appreciate the contributions made by grenades. It’s time to stop thinking about your individual paintings and start concentrating on your entire body of work. Hopefully this little guide will help you start churning out explosive masterpieces time and time again…

The remainder of this article will be totally without art metaphors. In fact, to ensure our masculinity remains intact, here’s a hot babe:

Now, before we can give tips on how to effectively use grenades, it’s important to know the various types that are offered in the game. We will do just that in this week’s Teabag Prevention.


THIS WEEK: GRENADES!


Frag Grenades


Nothing fancy here. If it explodes near you your shield will go bye-bye. Interestingly enough, the same thing will happen to your opponents. A well placed frag works just as well as a body shot with a sniper rifle, leaving opponents essentially naked and lubed up for one good burst from your battle rifle.

Tip #1 – EXPLODILE DYSFUNCTION

There is a slight delay that is triggered once the grenade makes contact with the ground. Walls, ledges, and ceilings don’t count so be sure to toss a few of these around a corner to clear out an area before you go charging in.

Once you get the timing down you’ll be leaving a trail of dust between you and those dead people behind you.


Tip #2 – BOUNCING BABY BOMB

As you just learned: frag grenades bounce. This is very important. Practice this and use it in every which way imaginable. Get creative with your angles and you’ll see amazing results. They’re also a valuable tool in disabling your enemy’s shield before they disable yours. This tip is closely related to last weeks Tip #1. In cased you missed it, here it is (the main difference is the bounce…practice your bounce, learn your geometry and dominate your bitches before they even see it coming):

http://geekscape.net/features/view.php?featureID=199fdff52dc40ac7d8a12f5a02e9b91e


Plasma Grenades

Soo pretty!


Quite possibly the best weapon in the game. What else can blow up an entire vehicle and kill everything inside it? Quite a few things, actually, but THIS one lets you do it with style. Unlike its human cousin the frag grenade, the plasma, or “sticky” actually has the capacity to guarantee a kill. The explosion is more powerful than the frag, and splash damage alone can do the job. The real fun comes in how the sticky got its name. If it comes into contact with an enemy it makes instant friends with him, but quickly realizes that guy took naked pictures of his sister and explodes in anger. The problem with this, however, is that anyone who gets stuck instantly becomes a suicide bomber. Know that using these may actually result in a kill for BOTH teams if you’re not careful. There’s a three second timer that starts the moment it’s activated. That’s all the time you have to prevent that jerkoff on the other team from becoming a martyr.

Tip #3 – THE ‘OL STICK OR FLIP

So you’re rushing the Spartan Laser spawn on Valhalla. A Warthog is barraling at you at full speed. You have two options:

Throw a grenade into the path of the Warthog, which will make it flip, and make the occupants easy targtes.


or

Go out with a bang. Simply stick the Warthog,

ideally the driver, but you might not survive it.


Spike Grenades


I’m not crying, I just got something in my eye.


A very close relative of the Plasma grenade, the Spike can also guarantee a kill if your opponent gets stuck. Unlike the others, though, the Spike will stick to any surface it comes into contact with. Learn to use this as you run around corners to drain off a pursuing opponent’s shield. There are few things more satisfying in the entire Halo universe than the squishy thud you hear that says “Nice Spike throw buddy. Now sit back and watch that guy blow up.”

Tip #4 – LUCY! YOU GOT SOME ‘SPLODIN TO DO!

The spike grenade blows out the top, therefore, to kill people effectively, throw it on a wall behind them. The nade will blow out the top, straight at the target. Also, throw a nade at the opposite wall of a doorway if you’re being chased. (Courtesy of Nick)

Also, it’s actually heavier than the others, so you’ll need to aim higher than normal to land a direct hit. You’ll need to level your crosshair slightly above or enemy like so:

Also make sure you throw it into the direction they’re heading.

This will ensure an accurate hit and will adequately account for the relative weight of the grenade itself versus what you are used to.


Fire Bomb Grenades


It’s a grenade that makes fire – much like a molotov cocktail – but don’t bother. Bungie toyed with our emotions when they put this in the game. As of right now, it’s not available at all in matchmaking. The only time you’ll see one of these is in a custom game. If you WERE to come across it, know that you can use it to trap enemies in an area or to stop their pursuit of you. Once it comes into contact with anything it sends out a patch of fire that will take down pretty much anyone who is unfortunate enough to be near it.

Tip #5 – SPARTAN’S INFERNO

Firebomb grenades can be used for a variety of things that, sometimes, aren’t meant to kill. When playing an objective game, such as Oddball for example, you can use this grenade to set up a barrier made of fire. All you have to do is toss it to the ground.

Once that’s done, you can either make a getaway like so:


or

stay to see if your enemy will charge through the fire. If they do charge, they may or may not catch on fire themselvs, but they will get hurt. Either way, they’re going to be yours, because you have funneled them into a path that you have chosen for them. Since this was your choice, use it to your advantage to hit these jerks hard and kill them before they can even see the fire fading from their faces.

So practice your bouncing, sticking, and height adjustments enough to dominate those guys who throw their grenades behind you instead of in front of you. After you perfect these steps you’ll be eating everyone you play with for breakfast, well-done.


This week’s Teabag Prevention tips were brought to you by:


For comments, suggestions and inquiries please email us at TeabagPrevention@gmail.com


Hello folks. Are those bastards kicking your ass every time they pick up the Battle Rifle during a Slayer match? Are you on the losing end of most fights involving a Battle Rifle? Don’t blame the weapon; she loves you. This is your fault. It’s ok, though. That’s why we’re here. This week, the Teabag Prevention team brings you some marriage counseling to enhance your rocky relationship with the most commonly used weapon in the game.


THIS WEEK: THE BATTLE RIFLE


Tip #1: THE BOOM-BOOM SHOOT

This is an important and incredibly basic strategy you might use while carrying this wonderfully reliable weapon during any match. It may have a slight learning curve, but the speed of the kill will make up for it.

Step One: Throw a grenade near your enemy; preferably right at their feet. Serve them the morning paper.

Step Two: Once they’ve received the morning edition of The Exploding Grenade, it’ll leave them with no shield. Watch them suffer for an entire half second (probably the longest you should ever let yourself rest during a match).

Step Three: This will leave your enemy open for the killing. You may choose their poison. The easiest kill would be one shot from your Battle Rifle or an easy melee kill. Depending on how far away you are. Try and depend on the Battle Rifle because even though a melee is a very powerful weapon, it leaves you extremely vulnerable to getting “stickied” or to having them melee you back. Using your BR will prevent you from getting too close to your enemy, as well as cutting the time in which they die in half. Now they’re your bitch.


Tip #2: SMACK YOUR BITCH UP


When locked in a firefight with an enemy that also pocesses a Battle Rifle, take either body or headshots while running towards them.


By the time you get to them a simple melee should get you a kill. Observe me laying the smacketh down on somebody’s face:


Smack dat bitch. If you are too far away to try and smack dat bitch, always aim for the head. Once you disable their shields one headshot should be all it takes. An enemy can take more than one body shot when they have no shields and this time could be the difference between life and death; so please practice your headshots. For tips on how to work on your headshots, please refer to nowcasting.com. If you want to kill people by shooting them in the head better, then please refer to the No-Scoping 101 section of last week’s Sniper Rifle article found here. The same tactics can be applied to using the Battle Rifle.

Tip #3: GET SOME HEAD


It’s always possible to get locked into a Battle Rifle fight in which both oppenents have a BR. During these epic battles of who-can-aim-for-the-head-better, your lack of no-scoping skills comes back to bite you in the ass and takes a huge chunk with it.

The most important thing to do, if at all possible, is to disable your enemy’s shield. Once you disable their shields one headshot should be all it takes. An enemy can take more than one body shot when they have no shields and this time could be the difference between life and death; so please practice your headshots. For tips on how to work on your headshots, please refer to nowcasting.com. If you want to kill people by shooting them in the head better, then please refer to the No-Scoping 101 section of last week’s Sniper Rifle article found here. The same tactics can be applied to using the Battle Rifle.


If your potential bitch has the same idea, you may notice that both of you are now running towards each other to end this fight with a quick smack to the face. This is a lot of people’s first impulse. When this happens, it’s important to have fast reflexes and shoot immediately. Shoot before they either figure out that they need to be doing that as well, or before they have a chance to melee you. The quickest and best way to ensure their death, once again, is to shoot them in the head. Practice makes perfect (and that is the closest we’ll come to acknowledging the name of this tip, thank you very much).

So remember: Go for the head instead of using your hands. It’s always the best, quickest and smartest idea. Anyone can use their hands; but someone who is good at the head will always come out on top (we totally lied).


Tip #4: Them long-ranged shots…

During a Big Team Battle game, or any other large scaled-map game, you might encounter enemies that are pretty far away. Killing them may be difficult if you don’t know how to do it right. Here’s how to do it right:

Learn from henchmen with machine guns from shitty action movies in which the protagonist evades a small army simply by running; move the crosshair in front of your enemy.

By doing this, you make the enemy run into your bullets. It also gets you easy headshots. Just a few shots (usually three if you do it right) and you will have yourself a cross-map kill. This is often a proud moment. You can even show it to your friends as proof that it happened; unlike that perfect blonde chick “you spent the weekend with” in Canada – yeah right, Brandon.

Note: This is effective on medium sized maps as well.


Tip #6: GET MORE HEAD. EVERY DAY. ALL THE TIME.

The Battle Rifle in Halo 3 takes more shots to kill someone than it does in Halo 2. This can be problematic, but can be solved by one thing: practice. We can’t reiterate enough how much you should be practicing your headshots with the Battle Rifle. When practicing, please remember:

1. When you are in a Battle Rifle duel – or any duel, for that matter – start shooting FIRST.


2. Keep your crosshair level with their head and strafe back and forth like you learned last week.


3. Don’t switch to grenades, don’t switch to a weapon that “shoots more bullets”. The more shots to the face you land, the better off you’ll be than with any weapon that can fire even twice as many bullets at a time. Much like we told your mom last night: quantity isn’t what counts – it’s all about quality. Just keep shooting accurately, and if you’ve practiced your headshots, this should equal a kill.


Things to Remember


– Shoot first.

– Level your crosshair onto the enemy’s head.

– At far distances, shoot ahead.

– Use the tactic that is easiest for you.

– Practice your head shots. A lot.


Now that you’ve learned what you need to do to make the most popular weapon in the game work for you, remember to use it. Don’t stick to the Assault Rifle you’re so comfortalbe with, or even the Spiker that you’ve come to love so much. Use. The. Battle Rifle. Honestly. Do it. Because if you don’t use it, you will definitely lose it.


This week’s Teabag tips were brought to you by


For any inquiries, comments, or questions about this week’s Teabag Prenetion article, please email TeabagPrevention@gmail.com.

Since the dawn of the new millennium, the First Person Shooter has generally had a weapon called the Sniper Rifle. This weapon has strong ties with the catch phrase “one shot, one kill.” Not for you? Then, unfortunately, you’re the one dying, you’re the hearing the boasting of the enemy, and you’re the one who seeks vengeance. Many have mastered the sniper rifle, but most have not come even close. These people are called “target practice”. This breed of inferior human beings who haven’t mastered the sniper rifle often camp out with it – like a real life sniper would. But this ain’t real life, THIS IS TEABAG PREVENTION WEEK #2!

THIS WEEK: THE SNIPER RIFLE

The sniper rifle has evolved from the last two Halo games with only some minor tweaks – nothing too serious. So if you’re familiar with both previous games, you shouldn’t have had a problem picking one up at the beginning of your Halo 3 career. That is, of course, if you were good at it in both previous games. If not, you’re one of the reasons why Teabag prevention exists.

Long Range Tips

TIP #1: SLOW AND STEADY GETS THE KILL…

 
It’s always important to adjust your sensitivity. For some, its important for it to be as low as possible, others may want it higher up. It depends on the player. If you find yourself spending 4-8 rounds of a sniper rifle on one player, you may want to lower your sensitivity. If you find that you frequently tend to shoot behind an opponent in your games, then you may want to heighten your sensitivity. Try every level of sensitivity if you have to.

Here are the Pro’s to changing your sensitivity:

a) Some of the best players do this.

b) It’ll be easier for you overall.

c) You’ll have less anger toward yourself (regarding Halo).


To adjust your sesitivity, simply:

-Press start while in the pre-game lobby

-Switch over to “Settings”

-Highlight “Game Controls” and press “A”

-Scroll down to “Look Sensitivity”.

-Then make your adjustments. 10 being the highest responsive setting and 1 being the lowest responsive setting. Lower usually means easier accuracy, but it will mean slower reaction. Gauge your priorities and come to a happy medium. Happy adjusting!

Mid Range Tips

TIP #2: “ZOMFG! DiD aNyonez C dat?!?!”

 
It’s when you’re running, R trigger held down, screaming your battle cry, hoping you’ll get him or her with your Assault Rifle, then…you’re dead. As your body falls, you hear the sniper yell, “WOOOOO No-Scope!!!!!”
Those who use the Sniper Rifle more than the average player are usually relying heavily on no-scopes. They can be difficult to achieve. A lot of the time, these “no-scopes” are pure luck – but a certain type of luck we like to call Planned Luck. You gauge your chances and you take the shot even though someone is unloading an entire clip into you. Planned Luck. It’s like counting cards while gambling, the better you are at it, the less luck is involved and the more skill comes into play. There are tricks to No-Scoping, and with practice, it should become as easy as your sister.

NO-SCOPING 101

· First things first: level the crosshair with the enemy’s head by moving the right stick up and down.


· Wait for the enemy to come into sights.

· When that happens, if you didn’t have time to shoot, or if you missed, move the left stick slightly to the left or right to strafe. Strafing will make it easier to keep your sights level and to hit your target without disorienting yourself.

· The trick here is leveling your crosshair with their head and having an easy and reliable point from which to execute your shots. While aiming at an opponent’s head from medium or long range, it is not recommended for beginners to use both sticks at the same time, as it will just frustrate the beginner and he will miss and die. In real life.
· If you NEED to try both (strafing AND using the right stick to aim), then the best idea is to learn to do both separately – preferably while not moving, at first. You may then work your way up to using both. Then you may use both during combat and you’ll be nigh unstoppable.

Close Range Escape Plans and Tips

Tip # 3: I’VE GOT TO GET AWAY(YEAH YEAH YEAH YEAH YEAH)!

 
Sometimes when you’re sniping, the enemy will bring the battle to you – kind of like when you’re staring at a Persian guy’s hot Persian girlfriend at a bar. In both of these situations, you need to bail out right away.

If you are playing a team slayer match, you may have one of your teammates give you a ride in a Mongoose. Should you get on this Mongoose AND use that rifle? Of course! The first step is to use the no-scoping skills that we granted you earlier in the article. With this in mind:

· If you miss their head on the first try, no problem. Remember that two body shots with the sniper rifle equal a kill. A headshot is preferred, but not necessary.

· Don’t get over-excited either. You want to focus and make sure you get that perfect shot. The patience and the focus are worth it.

TIP #4 CLOSE-RANGE NO-SCOPING

Say you’re camping with a sniper rifle and you start to get shot from behind (<—the joke here was way too easy to take). You don’t have enough time to switch to your secondary weapon (if you have one) so what do you do? You do the following:

Keep your cool. Try to go for two body shots, or one body shot then melee, and if you’re feeling lucky, try aiming for their head. Your choice.

No-Scoping from up close is risky, and takes a lot of practice.

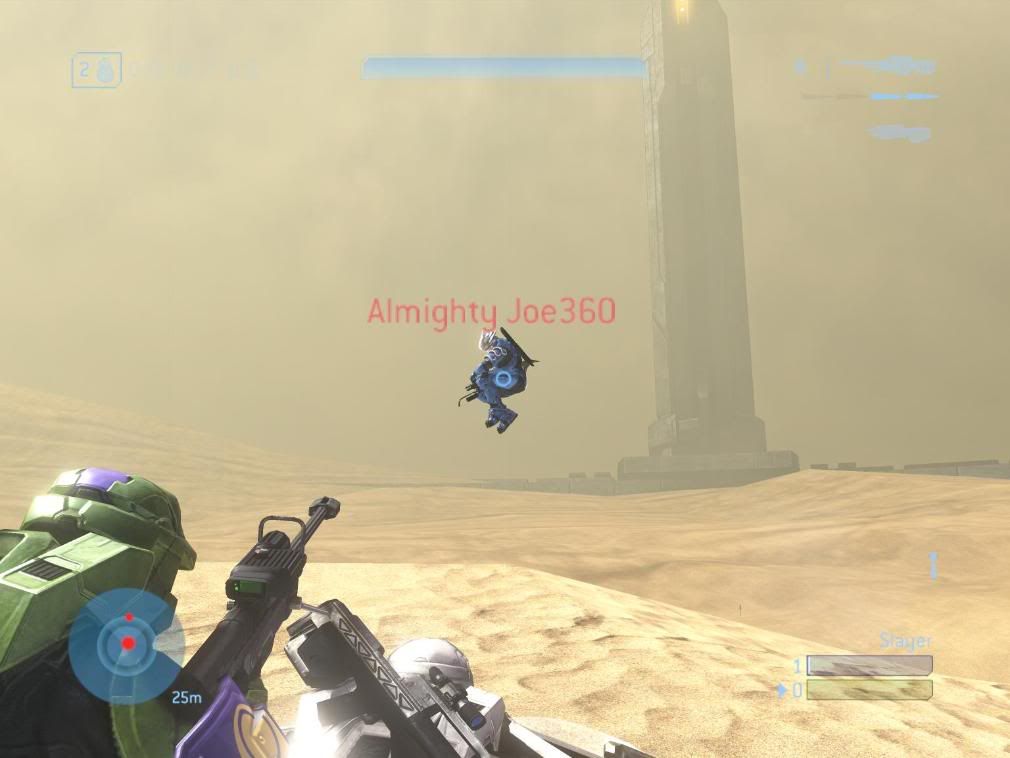
There’s also a posiblity that this enemy might jump around a little. Pay close attention to your motion tracker if this happens and you’ll find your enemy (below).

TIP #5 ONLY SUCKA BEGINNERS NO-SCOPE AT CLOSE RANGE


If you are a beginniner with the Sniper Rifle, never use it at close range when you know you have an easier way of killing your enemy. If it comes to the time when you know it’s too late to switch weapons and you’re stuck with just your sniper rifle, refer to the Close-Range No-Scoping tips above. If you are out of ammo on your Sniper Rifle, and cannot switch weapons, use your grenades and try to get to safety long enough to switch weapons.

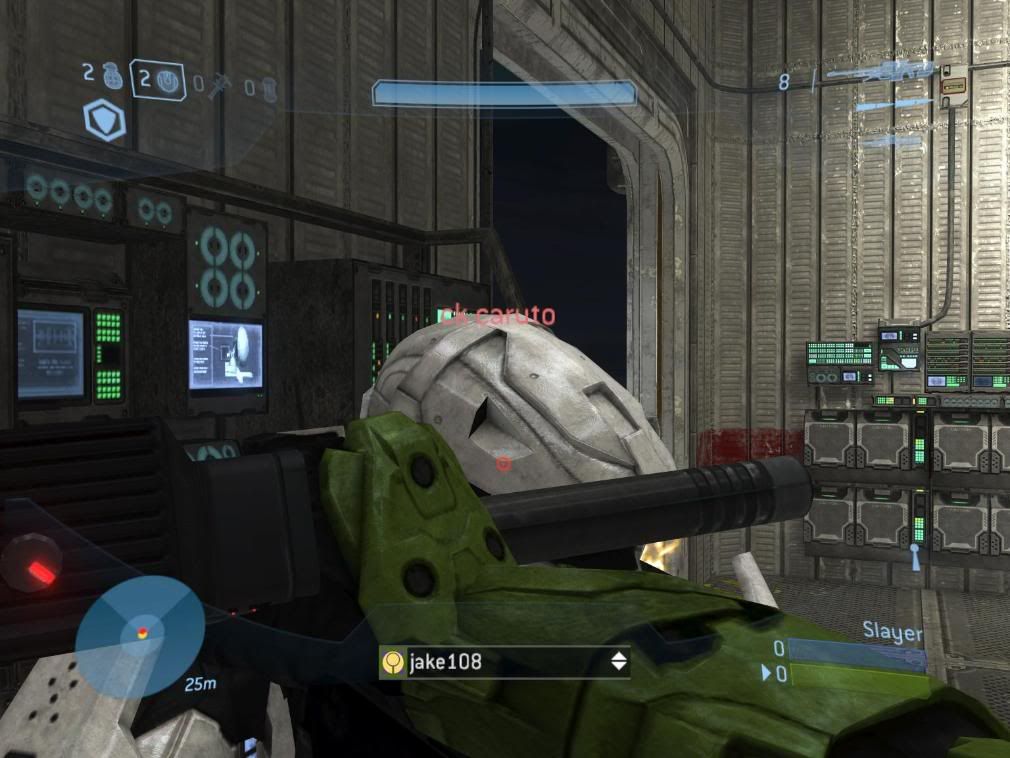
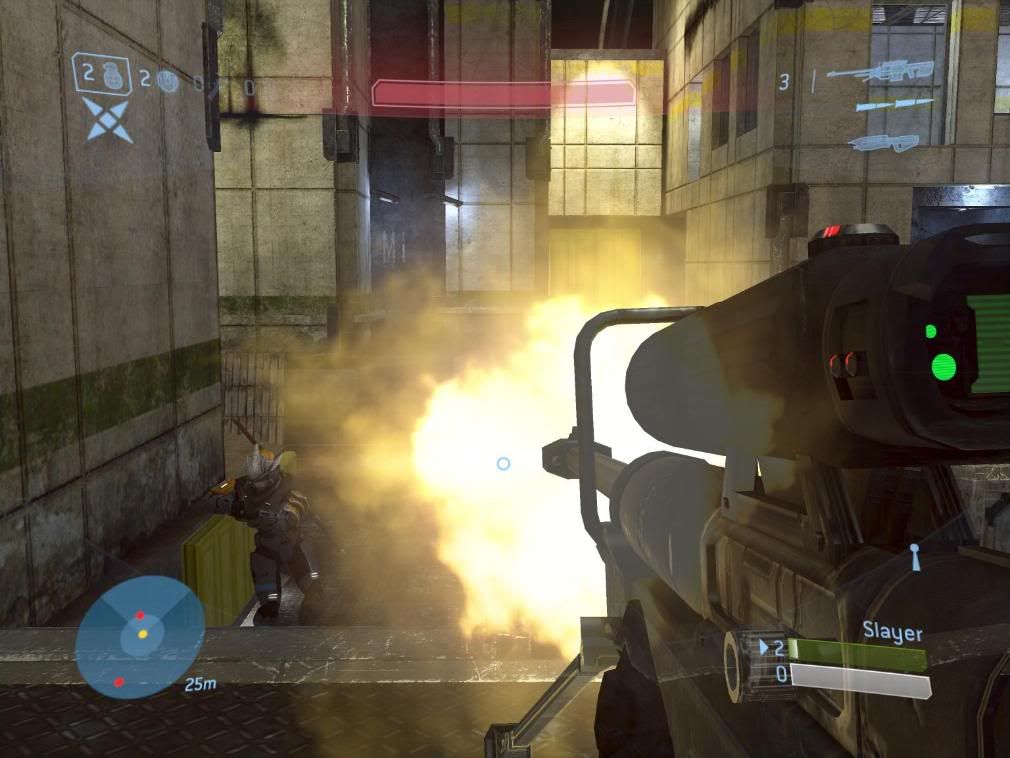
Example: On this screen below, if this person were out of ammo, they best idea would be to try and stick the opponent while running away or use a power drainer while jumping back and throwing a grenades.

Well, now that you are well-versed in the Sniper Rifle, make sure you get out there and practice before you try the closer no-scopes. Get confident with the weapon before you use it. Remember, even though it is the hardest weapon to excel with, it is arguably the most powerful one in the game.


If you maggots have any comments, suggestions, or further questions on the advice given on this week’s Teabag Prevention, please email TeabagPrevention@gmail.com

This week’s Teabag is brought to you by:


Halo isn’t a video game. It is a sport. It is a way of life. It is the best console FPS multiplayer out there right now. Don’t like it? It’s cause you suck at it. Welcome to Teabag Prevention: the weekly column on geekscape.net that will solve that Halo sucking problem you’ve been having – as well as that problem known as “your social life”. Get ready to stop contributing productively to society with the rest of us.


This Week: The Legendary Map Pack

Blackout

Blackout

As geeks, we spend disgusting amounts of money on a lot of crap we don’t need. We get screwed into collector’s editions, box sets, variant editions, anniversary packs, and new maps for our favorite FPS’s. On April 15th, 2008, the Legendary Map Pack came out for the Halo 3 multiplayer on XBox Live. This map pack made “this was not a waste of money” something more than a mantra you say to yourself as you’re reading your credit card statement – it delivered. Solidly. Here’s how to make these maps your new breeding grounds for pain.


Blackout’s setting is what appears to be an oil rig set up in the middle of an artic ocean on an alien planet. Its darkened skies and awesome moon set up a much darker side of Halo’s multiplayer maps and as we all know, Blackout is a remake from the famous Halo 2 map, Lockout.

TIP #1: MIND YOUR GRAV LIFTS!

Always take note of a Gravit Lift in any map. In Blackout, there is one lift that will take you to the surface of the map. Say you’re running close behind someone, they go up the lift, what do you do? There are multiple ways of getting the job done in the next moment or so. 

a) Throw two grenades at the lift which will follow your enemy all the way up and explode near him or even kill him.


b) If you are sure you know where they will be standing, you can follow them up (waiting for your grenades to explode) and shoot your enemy dead in just a few shots – their shields should be down at this point.


TIP #2 SPAWN WITH THE WIND

One of the most important things to know when going into any map is where each weapon spawns (where the weapon is placed in the map, in default settings mode, at the beginning of any non-custom match). Get to one of these points as fast as you can. The most easily accessible and important spawns in Blackout are the Sniper Rifle Spawn and the Sword Spawn.

The Sniper Rifle spawns at this tower (directly across from the tower with the Battle Rifle).

Things to do when retrieving the Sniper Rifle at this spawn:

a) Mind the explosive canister. Either shoot it yourself from a safe distance, or grab the Sniper Rifle and run. The explosion from this will most likely kill you instantly.

b) Do not camp out here. It is an easily accessible and directly shootable spot. Use some of the other rooftops and high points located throughout the map.

The Sword Spawns in the lower part of the map. If you are where the Battle Rifle spawns, then this room will be just a jump away – to your left.

The shotgun spawn is located just under the lift room pictured here:

Walk down the hallway as pictured here:

And you’ve got yourself a shotgun.


After you have the most imporant weapons in the game, the sneak-attack nature of this map should be no problem for you to handle…unless you’re completly awful in which case it’s a good thing you’re reading this.

Remember:

1. Know where the power weapons are such as the sword, shotgun, and sniper rifle.

2. The Battle Rifle is a fine killing tool.

3. Pay close attention to your motion tracker.

Avalanche

Honestly, we were excited about Blackout, but the idea of Hornets in the sky doing battle with Wraiths and Scorpions on a large scale, Hoth-like, remake of Sidewinder was just too overpowering. Such explosions and cross-map laser shots brings us into giggling school girls as we write this.

Avalanche is awesome.

Whenever we spawn into this map, our first instinct is to rush the Hornet. You may have noticed that it’s severely dubbed down. Missiles are disabled and the machine gun does less damage, can it be used efficiently now that it’s finally in Matchmaking?

Tip #3: GET IN THE CHOPPA! (Actually…Get in the Hornet – It’s called a Hornet)

In Objective gametypes, Hornets can be easily used to transport flag carriers, bomb carriers, or just some friends to help take over an enemy base. The enemy base will always be on the opposite end of the map from where you first spawn. This Hornet can be your best friend.

Look how awesome you look carrying that flag. Clear sailing, right?

but beware, a single shot with a Spartan Laser could take you down.

Tip #4: CANNON IN D (FOR DEATH)

Man Cannons – Grav Lifts that launch a man forward. A grav lift carries you somewhere – a MAN CANNON shoots you there.

On avalanche, these Man Cannons are the easiest way to get around the map on foot. This is especially helpful during objective games when every vehicle is either being used or on fire somewhere on the map. During these games, time is of the essence! Use them while on foot.

At spawn point, though, you may be thinking to yourself “Ooo! Man cannon! Easy transport!”. You’re wrong.

If you want to get to the middle of the map as fast as you can: instead of flying off the first one you see, try going to the teleporter either to your right or left, depending which base you’re at.


Not only will you be teleported to a Man Cannon that will get you to the other side of the map much faster, but you’ll also be treated with a Machine Gun Turret, and Rockets.

TIP #5: KNOW THY SNIPER SPAWN

The Sniper Rifle spawns right outside the “middle” divide between both bases. Look for them at the oppisite location of the overshields here:

and here:

TIP #6 CAN YOU SEE ME NOW? GOOD.

Your Active Camo (the thingy that turns you inivisible) spawns behind this icicle a stone’s throw away from your base’s Man Cannon. In this map, not being seen will be important. Why? There will be vehicles on a rampage during any Slayer match, that will hunt you down on your way to infiltrating any enemy base and taking them out from the ground up. If they can’t see you, your mission will go as planned. Here are the two respective Active Camo spawns.


a) By the rock, oppistie of your spawn point.


b) Just under the tree in in the towards the oppisite side of your spwan point.

TIP #7 USE PROTECTION

With the amount of power weapons and vehicles wreaking havoc during any Slayer match on Avalanche, your best chance of staying alive (other than not being seen) is having twice the amount of shield than everyone else on the field. Here is where to get that kind of protection (it’ll make you “feel” less):


The Overshields spawn right across from where the Sniper Rifle does – right outside the middle divide between each base.

a) This overshield is up the hill, towards the middle of map. This one should be on your left red team.


b) Again, up the hill, towards the middle up the map. This one should be on your right blue team.

Aside from that, the most obvious tips for this map are:


1. Get down below and share a vehicle with a team mate. They are right below where you spawn at the base of your…base

2. Don’t run around without protection or cover. There are too many vehicles for that.

3. Make sure you use the teleports to your advantage

Have fun in the biggest and most extreme map in the Legendary pack. Don’t get killed.

GHOST TOWN

This time, we are given a jungle on the GROUND, not in the AIR. Ghost Town is an abandoned water station where just about everything except barrels of water is destroyed. I guess maybe the Brutes had plans for export? Not only is this map asymmetrical, but it also features a safe zone, you know, so you and I can spawn safely…unlike CoD 4. Moving right along…

Ghost Town may be the least favorite map among the masses (as asserted with the amount of times it’s been called “gay” during pre-game lobby talks), but it’s certainly not a bad map. At the start of any game on this map, it’s important to grab a weapon that will do damage at a medium-range, such as: a Battle Rifle, Needler, or Brute Shots.


A) A Needler can be found above the Mongoose at Blue base.


B) A battle rifle can be found in the same base as the Needler, just a little behind you to the right.

Tip #8: You can teach a few puppies old tricks…..

When protecting something like a flag, base, or a VIP, you might want to carry the “Shotty Sniper” combo (Screenshots of spawn points for both the shotgun and sniper rifle. , that way you can kill baddies from afar,

and if they step into your personal space….

“oH noes!!11”

BAM!!!

Tip #9 FLIP THAT THANG

Say someone steals your flag and an expert Mongoose driver makes it through the map, and is about to pick his friend up,

A Brute Shot isn’t necessarily powerful enough to kill someone right away, but if you aim towards the tires of a Mongoose, you’ll have a very good chance of flipping it,

and killing those who tried to escape…


1. Ghost Town can be enjoyable, with the right weapons. If you’re constantly running into someone who has a superior weapon, you may want to rethink your strategy and weapon choice before going into battle.

2. Crouching can play a big role on smaller maps such as this one.

3. Equipment can change the course of the battle.

Now get off your ass, go to wherever your XBox360 is and get back on your ass and get that ass in these new maps. We’ll see you next week for the beginning of our Weapons series here on Teabag Prevention.

To send questions, comments, or advice inquiries to Teabag Prevention, please email us at TeabagPrevention@gmail.com.

This week’s Teabag written by:


Halo 3 Service Record